


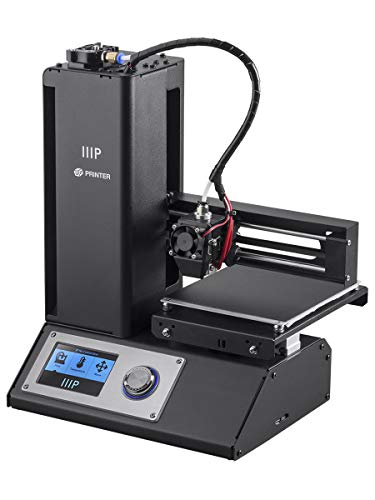
- The heated build plate and wide range of extruder temperatures allow this printer to work with any type of filament, from basic filaments, such as ABS and PLA, to more advanced materials
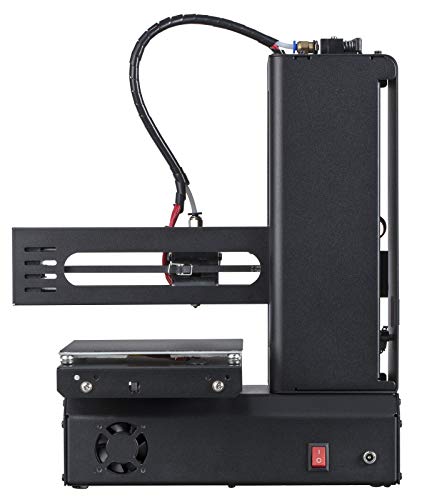
- Compact Desktop Design: Featuring a small footprint and basic, open frame design, this 3D printer is compact enough for any desk.
- Ready to Print: Unlike most other low-cost 3D printers, this printer ships fully assembled and has already been calibrated at the factory.
- We even include a MicroSDTM card with preinstalled models, so you can start printing right out of the box!
- PC and Mac compatible. Compatible with Cura, Repetier, and other software.Max. Extruder Temperature: +482°F (+250°C)
- NOTE: Check User Manual in Technical Specification before use. Maximum Power Consumption 120 Watts
-
Information
-
Twitter
-
Pinterest
-
Youtube
-
Facebook
Harry Howard
Amazing, inexpensive 3d printer which takes a little patience to get used to.
I am a 3d printing beginner and didn't want to spend much on my first printer. I wasn't expecting much from the printer so my expectations weren't high. I watched as many YouTube videos on setting up the printer as I could. As soon as I got the printer I flashed the screen and rom as well as changed its settings according to the videos. I didn't use the filament that came with the printer as there was very little of it. I bought some Inland PLA filament here on Amazon and loaded that instead. I started printing the included model of the cat and it came out great. I started downloading .stl files from Thingiverse and printing them without issue (Using Cura to slice). All was well and then my prints went to garbage. I watched more 3d print videos and apparently my bed was out of level. This is where the fun begins, NOT! I thought I would have to send the machine back because it seemed no matter what technique I used to level the bed my prints were still garbage. Finally I watched a video that suggested using a business card for each of the four corners (I had been using a piece of paper)... that did the trick. After practice, I can level the bed in no time flat. Again watch videos on leveling. I also had to clear a filament jam which was interesting.. again, another video to watch. I started playing with various bed temps as well as filament temps. I bought other types of filament to see what worked the best. Let me give you a heads up, if you are going to use ABS... Don't. It's a headache.. doable but still a headache with all the things you need to do to get it to stick properly. I did some ABS prints and they came out great but again.. a headache. I also found that about middle of the road for temperature depending on what the filament calls for is what worked for me. For PLA 60c (Edit: 40c is fine after the first layer) was perfect and for ABS I sliced whatever I was printing with the bed set to 60. Once the print would start I would up the bed temp to 80c. The bed would only get to around 78c. For ABS to work I had also used an Elmer's glue stick on my blue 3m masking tape covered bed to get it to stick. Again, stick with PLA. Oh I failed to mention, when the initial masking tape comes off the bed plate which it will, you can cover it back up with 3M blue masking tape, the same kind you use when you paint. Since I have played, I can pretty much tell by what I am printing what setting I should use. I can only suggest that you play around and watch a lot of videos. At this price and for a single spool of filament you should be having fun and learning. I have since moved on from using Cura and am now using Simplify3d which is rather pricey but I really like it. The small build plate is a challenge as a lot of models that you may want to print will be much bigger. Scaling has its issues. Trying to take off supports when the part of the model it is connected to can be tricky. I included a picture of my latest print (Not sure why it shows up on Amazon sideways). This had to be scaled down significantly from the original and lost some detail in regards to the terminator's hydraulics around the mouth and back of the head. But if you want to print bigger, you are going to spend a lot more on a printer. I am pushing this thing to its limits and I am coming out with some great prints. I have also bought another 3d printer with a larger print bed but I will not give this one up for my smaller projects.
Artika Lata
Perfect printer for getting started in 3D Printing
I'm just getting started in 3D printing. I am reviewing this as a entry level printer. There are some features that are available on more expensive models that would be nice to have, but for the price, this is just what I needed. It prints PLA filament easily straight out of the box. I tried ABS and there is definitely a learning curve with that and I haven't made it through that process yet. But I've done some really cool prints just using PLA. You need to buy a spool of PLA when you get this. The filament it comes with is only enough to print the demo. I would invest in one of the filament racks like this one https://www.amazon.com/Sienoc-Acrylic-Printer-Filament-Tabletop/dp/B01ERA2LZA/ref=sr_1_2?ie=UTF8&qid=1497835362&sr=8-2&keywords=filament+rack If I had seen it before I built one out of PVC I probably would have saved some money and time and just bought it. The little side mount filament holder pictured, just doesn't work well for non-spooled filaments. There are a couple of things that would be nice if monoprice did with the next release. 1. move the control knob out from under the print bed so it can be accessed while printing. 2. The knob is turned to change selections and settings values, and the pushed to select the item. It's nice and a cool idea, but a little cumbersome to use. I would like to see it broken out and maybe just use 4 arrows and an enter button. It would be easier for my old fat fingers. There are a number of things you will want once you get the printer so you might as well order them when you order the printer. 1. The filament rack I mentioned earlier. 2. Kapton tape. This helps your prints adhere to the bed. https://www.amazon.com/dp/B00LAJNOXK/_encoding=UTF8?coliid=I7XWJJDVRJT2E&colid=EISE16U5GCEJ 3. A spool of PLA filament (pick your color). 4. a pair of wire snips for cleaning up your prints (especially if you print on a raft). https://www.amazon.com/C2G-Cables-38001-Cutter-Inches/dp/B0009FUXWG/ref=sr_1_2?s=industrial&ie=UTF8&qid=1497835873&sr=1-2&keywords=wire+snips
Barbie Dollie
... I just received this printer and so far it's amazing! However I've noticed some people on youtube or ...
Ok I just received this printer and so far it's amazing! However I've noticed some people on youtube or other places that shows them having a bit of trouble setting it up so if you're planning on getting this printer use the following steps to have an awesome experience. 0.) Order a spool of Hatchbox 1.75mm Filament to either arrive before or at the same time as the printer. (The sample PLA included isn't enough for anything) 1.) The VERY first thing you do is use an X-acto knife to cut away the corners of masking tape covering the bed screws! LIKE I SAID THE VERY VERY FIRST THING! 2.) Use the provided Allen Key to lower the bed at each corner TWO full turns! 3.) Remove the tape from the hot end (NOT THE YELLOW TAPE AT THE NOZZLE) but the one that holds the hot end in place for shipping 4.) Plug in the power supply and turn it on 5.) Navigate to "Move>Home" and home the printer and guess what? The nozzle won't dig it's way into the print bed because what? YES we lowered the bed first! 6.) TURN THE PRINTER OFF! 7.)Now use a strip of regular typing paper and gradually start to raise each corner while checking the tension on the paper until you feel some resistance but not too much. In other words like a guitar we tune up not down! 8.) DO NOT UPDATE THE FIRMWARE UNLESS YOU NEED TO TO TROUBLESHOOT LATER ( In spite of what some gurus say on youtube) 9.) Take your SD card, load a test Gcode from Thingiverse (Print something you'll actually use like the New Dial for the MP select mini on thingiverse) it takes 26 minutes to print (NOT THE CAT! it takes too long!) 10.) After each print leave the filament in the nozzle and never try to pull it out once it cools because you'll break the hotend! To switch filament (Empty spool or different color) Preheat to 210 wait for it to reach that temp, extrude a little bit and then pull it out from up top) I wish this info was put together in one place like this when I was reading reviews, It took me like 4 weeks to gather all the steps. Now stop thinking about it and just order it!, a year ago you'd have to spend $500 to get a printer this good
Rick Omeasoo
Great printer! Worth every penny!
I got this as a birthday gift from my wife. I always wanted a printer but never made the jump because I didn't know anything about them. Also was not excited to learn new software. This is very easy to use and the quality of the machine and the prints are amazing! It comes with the software and a demo file to print. After using this I realize there's not much to it. Definitely recommend!
Annie Mace
best printer for the money and great build quality
Nadine Dauphin-Simmons
This 3D printer saved my life!!!
I'm in architecture school and have a disability that limits my fine motor skill. All through my college education, I couldn't make models of what I designed in Rhino 3D. Bought this machine for Christmas, now I show up to class every day with a new model. In architectural design, it's so hard to represent your design without a physical model. Plans, sections, and renderings only go so far. With this printer, I was able to quickly make prototypes and explore architectural forms. Traditional model crafting can take days of tedious work just to produce one prototype. This machine is so easy, and remarkably I had no trouble with it (so far). VERY IMPORTANT: Get a nice build plate surface. I used BuildTak. It helps so much in adhesion and unmounting of the 3D print.
Roxane Goodfellow
THIS 3D PRINTER WORKS
Replacing my dead Printrbot Simple...I found this little work horse...out of the box it has printed well and without a hitch. Love the Auto Leveling feature and the Live Adjust of the hot end to hotbed gap on the fly is a nice feature...Printed the supplier's provided lucky cat figure as a first test and it came out beautifully. As my next test I printed one of Marco Bergman's 200 scale tanks. Didn't have to tweet anything to get my print out successfully...The fine detail is great. The machine is quiet and compact. Haven't tried the WiFi connection as yet but will in the next days. The power supply provides 7 Amps so didn't labor while doing these first 2 1/2 hour print jobs, it was warm to the touch but not nearly hot. Printed using the MicroSD card...nice that I do not have to employ any of my computers to run the printer. The "paper" Users Manual is concise and well written. At first I thought that the TouchScreen control panel might be a bit too small but, after using the machine for two days I found it to be very usable.
James Lee
Must have for beginners. Perfect gift for students just learning.
Received this printer on Friday afternoon, within an hour I had it unboxed and calibrated, within two hours I read up on all the instructions and started using up the sample filament on the sample print that came on the MicroSD. Unfortunately the sample filament is only enough to complete about 25% of the lucky cat that comes on the gcode, but omg is it beautiful. For a printer that is so affordable and easy to setup the quality is pretty impressive. I would only recommend they put a different gcode that can be printed with the sample filament, or include more. I received my 1kg role yesterday and printed the full lucky cat and a holder for my arduino uno board... about to setup another print overnight and let it spin. Pros: - Very clean and sleek design, looks beautiful on a work desk. - Light weight -small footprint -easy navigation controls -intuitive menus (everything behaves exactly the way you'd expect, no confusing menu system) -once calibrated, just works -not noticeable from a room over as far as noise. (had to check up on it out of paranoia that it had stopped printing) - Quality prints... Just look at my pictures. Yes it is only 100 microns but for this price range, heated bed, and wide range of filaments... I was able to print a beautiful lucky cat with the little overhanging paws, and the words on the front without any issue. There was only a slight bit of slop on his left paw on the bottom but it took me all of 30 seconds to cut it off with an exacto knife. Cons: - manual calibration sort of a pain (once set, it's solid. read instructions and do the first minute or so of the lucky cat as stated and cancel the print, just to make sure. I had no issues and didn't cancel and just let it fly.) - a bit on the slower end... cura said 2 hours 16 minutes, actual print time more like 2 hours and 50 minutes. - small build frame at ~ 4.7 inches length and width. (but more than enough for most projects i'm interested in undertaking, and especially if geared for beginners. - the loading mechanism at the top, and not near the extruder end. This made for an awkward change out, I accidentally ran past the feed mechanism with the sample and tried backing it out manually and it snapped the filament... so I just loaded the new filament and hoped it would push the sample through... I even went ahead and started the lucky cat... the printer just ran with it and there was enough to do the raft then it transitioned right into the new color without issue. I was pleasantly surprised... so while i'd like to see the feed closer to the extruder I can see why they did it for keeping the machine simple and easy to use for beginners. - not sure why a spinning selection button, i would have preferred just left and right buttons. Works the same either way, just make sure you press center to select and not accidentally spin/select and do something you weren't trying to do. All in all 5 stars because this far exceeded my expectations.
Jasmin Lingad
A print comparison
Red robot = $2700 3D printer Black robot = $200 3D printer (this one) I'm stunned that you can now buy a 3D printer for $200 and get this good of a result!
Linda Briere
I highly recommend joining the Monoprice Select Mini Facebook group and doing ...
This was my very first 3d printer, purchased about a month ago. I highly recommend joining the Monoprice Select Mini Facebook group and doing a little background before your first print. That being said, it really isn't difficult for a beginner to get started provided you're enthusiastic and have a bit of patience. I have experimented with different layer heights and temperatures. The quality of this thing is amazing. MP has to lose money on this printer. It's a workhorse, too. I've done at least 20 prints so far and haven't had a clog or extruder issues. See the images for examples of the quality of prints. From what I can tell, these rival some from much more expensive printers ($500-$1000). I highly recommend the MP Select Mini as a first printer, or as a spare printer for a 3D printing enthusiast.