

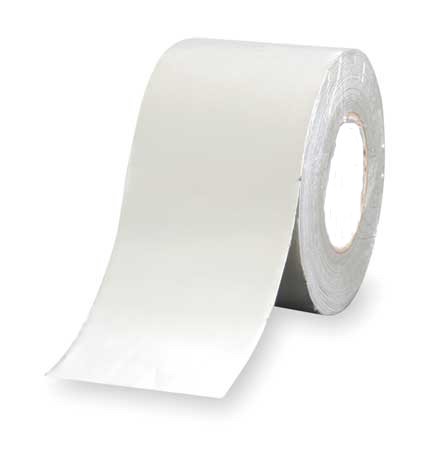
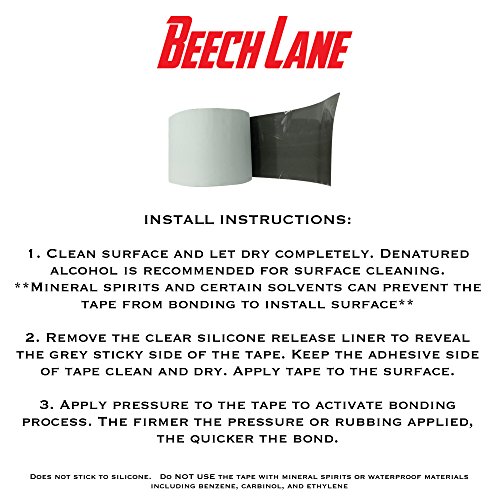
- WATERPROOF, STICKY WHITE SEALANT TAPE STOPS RV LEAKS - Tired of irritating RV roof leaks? Stop them in their tracks with this high quality sealant tape that gets the job done. Works on RV rubber roofs EPDM, PVC, Hypalon, Most Metals, and TPO. Does not stick to silicone. Do NOT USE the tape with mineral spirits or waterproof materials including benzene, carbinol, ethylene, silicone. Denatured alcohol is recommended for surface cleaning.
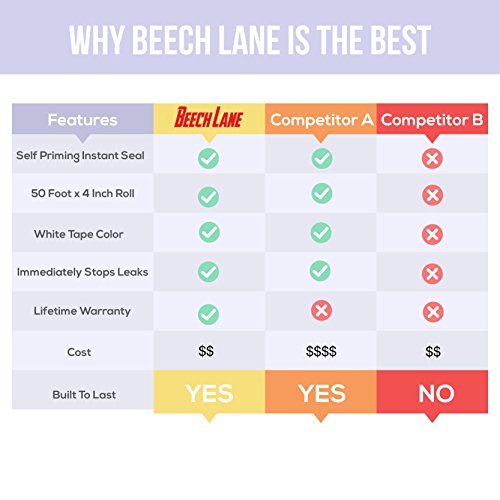
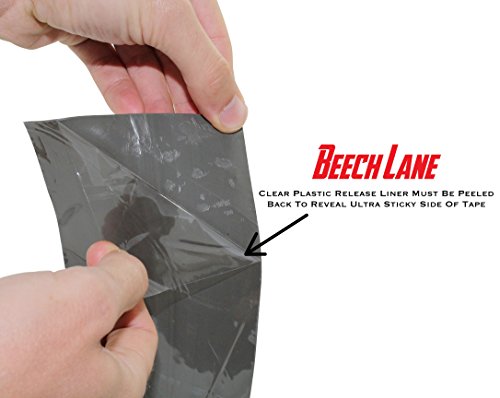
- PROPRIETARY SELF PRIMING TECHNOLOGY BONDS INSTANTLY WHEN INSTALLATION DIRECTIONS ARE FOLLOWED- Avoid structure rot, ceiling stains, and shelling out your hard earned money for repairs by using Beech Lane's RV Tape for a strong self priming seal. Installation is not recommended when air temperature and/or surface temperature is below 48F. Cold weather below 48F can cause adhesion issues during install.
- DESIGNED SPECIFICALLY FOR 20 YEARS OF CONTINOUS OUTDOOR EXPOSURE AND RESISTANCE TO ALL WEATHER- When you are miles from the closest hardware store, Beech Lane's sealant tape will come to your rescue. Have no fear when that dreaded hail storm comes, the old caulking starts to crack on the road, or your skylight starts to drip water in your rig mid trip. A must have accessory on board for leak emergencies on any RV trip.
- UNIQUE FLEXIBLE TAPE STRUCTURE ALLOWS FOR DIY INSTALLATION- Unlike other messy roof leak solutions that need to be repeated to keep leaks at bay, Beech Lane RV tape is applied one time for a permanent fix and can be installed by you. Avoid days of back breaking labor of having to strip and re-caulk your RV roof seams. Spend your time relaxing in your rig at your favorite spot instead of worrying if your newest caulk job will hold!
- LIFETIME MANUFACTURER WARRANTY- Beech Lane will refund or replace if you have any issues, no matter the time period.
-
Information
-
Twitter
-
Pinterest
-
Youtube
-
Facebook
Crystal Ash
I would recommend this.
This product worked very well for sealing a seam on the top of my camper. I had no problem applying it as some of the others have stated. It is important to carefully follow the cleaning and application instructions (use plenty of pressure). We had very heavy rains for the past week with no leaks. I hope that it will last a long time as I think it would be very difficult to remove (extremely sticky). So far, I would recommend this.
Trisha Redlund
Less money and a life time warranty
I just installed this sealant tape on my 1999 motorhome roof. I bought a 100' (2) rolls. saved 40 bucks over the competitors price. I applied it down both sides of my roof edges and both front and rear cross seams. Like most products like this, it's a bit tricky handling the backing foil while keeping it straight and not allowing it to stick to itself or other stuff, but it went on well once I got a system, incredibly sticky and when I applied pressure to the tape the sticky glue would ooze out a little. If it holds up as advertised I will be very happy. I know one thing! my roof won't leak where this tape is applied. (I read some reviews that said "not sticky", I don't get that at all)
Sabre Abuhania
As advertised
Can’t say enough! So easy to apply. I prepped area at edge of my slide out with denatured mineral spirits and let sit for a few minutes, Cut the tape as directed although I made my cut 1/2 inch longer than needed to allow for overlapping. Works perfectly and am very happy with the product! Almost considering using this product in place of lap sealant in the future for roof care, GREAT PRODUCT
Wendy Perez
Good and sticky
Clean the area where tape is to be applied. Carefully unroll while peeling the protective layer. Press down firmly and go over it with a roller or a tool to ensure that lots of pressure has been applied. Stand back and admire your work. No more leaks. Worked for me.
Sheryl Lynn Mumm
Tape Works Great, But There are Some Hints Here.
This tape works great and does the job well. I prefer it to caulking the seams. I have had my tool trailer for work for 15 years and most of the caulking for the seams on the roof has simply dried out and gone away. I decided to try this tape. As I am a home improvement contractor I am not stranger to peel and stick membranes. Here are my tips and tricks to make your taping job go smoother. - Have the trailer in the shade and don't let the roll of tape sit in the sun either. It is much easier to work with when the tape and the roof are cool. - Don't skimp on the preparation work. I spent about 2 hours getting the roof ready. 1-Scrape the old caulking away, 2-Use a wire wheel to clean all the areas the tape will be applied. 2-Wipe down with alcohol. - Don't be in a hurry to remove the backing. Just remove what you need to get is started. The backing on this tape is good in that it can be folded back and pulled out without tearing. This means you can get the line of tape started with just a little pulled out, lay the tape down right where you want it and pull the back out from under. Much easier to work with this way. - Buy a roller to press the tape down. This is much easier that using your hand. - Keep you leaf blower handy so you can blow the dust off the roof. You still need to wipe it down with the alcohol though. Some dust is still left behind even after blowing it off. I am not sure about the longevity of the tape, as I just installed it, but it is super sticky stuff once the sun hits it. The sun caught me for the last couple strips and it was much more difficult to work with. Once it is down you cannot peel it back up. Hope this helps in your project.
Audrey Andersen
Excellent product
My project was to seal the seams on a insulated patio roof. I used both Eternabond and Beech Lane products. From the adhesion standpoint both seemed to be equivalent. However, the Beech Lane product was somewhat more flexible and would conform to any roof irregularities better then the Eternabond product. Overall both products are excellent; but, the Beech Lane product is $20/roll cheaper.
Amber Elizabeth Lewis
as good as the more expensive stuff!
worked perfectly, and seems to work just as well as the Eternabond tape. I was using them side-by-side since I had a little of the other left, and you really couldn't tell the difference in looks or performance. Only time will tell in the long run, but you can get this without worrying.
Oulyme Odiug
It works
Recently used this to reseal the roof of my 1996 Jayco tent trailer. The roof wasn't leaking but it was showing it's age. I'd recaulked the seems but didn't trust the 22 year old joints to hold up to many more winters without help, particularly the center seem. This product covered the joints nicely. I was careful to not expect the tape to stick to anywhere I had previously caulked, as the product warns it won't stick to silicone. After doing the center seem and mostly being pleased with the results, I decided to also do the outside edge. This meant wrapping around the corners. This stuff doesn't go down rolled edges without help (e.g. cutting to allow it to bend appropriately and stay flat) so I was nervous about doing the corners well. All in all I think it turned out pretty good! I started from the bottom of the corner, because this stuff tends to stretch a little as you work with it and I didn't want to end up with some ugly, visible and uneven bottom edge. I cut the product back at the two points of the curve where it needed to bend, just far enough into the curve so that I could overlap the top flap over the bottom and water would still run out and down. After all four corners were done I then wrapped the outer edge of the roof down to the top edge of the "gutter" provided by the awning rail. I did trim that piece to the width I wanted so that it would come out looking like the same width as I had used at the corners (which was full width). I then caulked a few of the joint areas of the tape and then, finally, painted the entire roof with a product designed for RV roofs. The final picture shows the final product. Now to see how long the stuff holds up...
Shelley Cain
It went on very easy, very tacky once you removed the clear plastic ...
I tried some rubber roof coating on my camper ,put it on with a 4 inch roller did 2 coats ,the very next winter I found 2 leaks inside my camper.So I searched different products .And found this Beech Lane RV white roof Sealant,Si bought a row 4" x 50' I was able to do most of my camper roof going down each seam ,about every 4 feet apart,It went on very easy ,very tacky once you removed the clear plastic film .I tested my roof with water on it ,And it sealed it .I'm very happy about this product .I went on line to buy some more to finish my roof on the the camper ,and keep the rest for emergency .and I might try it on my canopy where it's rotten away .Ken
Beth Davis
Easy to use seam tape
Installed this tape on the front and back seams of my 5th wheel. Seems to be a very durable. Tape. Once you get the back of the tape off it went down fairly easy. I cleaned the surface with alcohol then installed by peeling off about 10-12 inches of backing to avoid getting off course. I popped a chalk line to keep it straight. So far so good, installed easy and after using fingers and palm to adhere the tape it stayed down and hopefully is watertight. Update. I had both ends ( 6 " or so) pull away travelling down the highway. not sure why, maybe silicone and it did not adhere. I am planning on overlaying the tape but I will add additional adhesive to help stick this time. All other areas stuck really well and seem to be watertight.