

- Solid and Silent: Designed with a Brushed Aluminum look front panel and solid panels
- On the Go Compact Design: Pack in your parts for a compact design offers the perfect fit in small spaces or on the go
- Tool-free design: The innovative 2.5”/3.5” tool-free drive bay design minimized the hassles of installation/removal
- Covered Power: Supports Full Length Power Supply cover with PSU window
- Budget Gamer Design: Pre-mounted holes supports mini-ITX and m-ATX Form Factor Motherboards.PSU: Standard PS2 PSU (optional)
-
Information
-
Twitter
-
Pinterest
-
Youtube
-
Facebook
Crystal Miller
Please read the full review before purchasing
First, I absolutely love this case. It's solidly built and dampens noise well. Cable management is quite good due to the large number of rubber covered cable management holes. There are also ample filters, and you can mount up to a 140mm fan anywhere you can install a fan. It's also a very quiet case However, there are some things I cannot in good conscience post this review without talking about. 1. This case is HEAVY. This is due to the dense noise dampening material. If flying with this case, remove the side panel and place in separate bag to keep from desperate repacking of your suitcases 2. The PCI slot covers seem to be cheaply made. However, I am actually glad they cheaped out on these in order to keep the price down and focus on the other components. 3. There are no SSD only sleds. While this is not an issue, it would have been nice to have one in order to proudly display your SSD. 4. The PCI slot plate has rivets that protrude out about three millimeters above the slot cover screws. While it will most likely not be an issue for most people, if you intend to get an acrylic GPU brace such as the Emperor's Magic Universal Acrylic GPU brace, you will have to do a bit of filing to be able to install it. It took about two hours for me to do this. 5. There is no PSU cable hider. While most won't mind, it would have been a nice touch. 6. Cable management, although made easier with the rubber covered cable management holes, CAN be a bit difficult as the noise insulating padding does not allow for much clearance. PLAN YOUR CABLE MANAGEMENT. Seriously. This should take the majority of your build time. The side panel is flat. A bulging panel is not something to be desired. As a custom rig builder in an electronics repair shop, this is what I mainly focus on. An amateur makes a rat's nest. A professional hides his cables and plans his cable management. A fully modular PSU with flat cables is ideal. 7. There are only three Hard Drive sleds. Once again, this should be a nonissue, but if you want many hard drives, buy some more. Personally, I removed the sled cage and mounted my drives in the rear. A redeeming feature of this particular item is you can use each of the 5.25 inch bays to store either a single 3.5 inch Hard Drive or 2 2.5 inch drives (Laptop HDD's or desktop/laptop SSD's) That's it. I highly recommend this case to pretty much anyone wanting to build a desktop PC and has a basic understanding of building
Nunik Milagros Bekasi
Super Quiet, Lots of ROOM - highly recommended - well worth the meager uplit in cost.
I've put together maybe 12 - 14 PC's for myself over the past few years. I have YET to find something of the quality of this case at its price point. Helped a friend spend $2K on her build, and her number one rqmt was "silence". This case delivers. If "quiet" from MGSV built a PC, she would choose this case. PRO: 1) AMAZINGLY quiet. I selected this for a friend who had QUIET as her primary concern. This case delivers. 2) Power and other cable routing. Excellent. All o/t PSU cables go out, behind, and in - very nice. 3) interior space. SO - here's the really cool item. Mainboards today have an 8 pin power connector as well as the main 24 pin connector. They are often in the "upper left corner", facing the case, backplane on the left. First time through, I just plugged everything in to make sure it all worked. So, when I was finishing this case off, I was capable of reaching in past the monster CPU cooler I bought, unplug the 8 pin power, and re route without needing to get my 14 yr old teenager who has smaller hands to plug it in. Or make a blood sacrifice. Very nice. 4) the Backplane screws ACTUALLY FIT AND work, been having problems w/my two recent $50 cases (no more Antec for me...) 5) front door makes a very nice seal/closure. Con's 1) the USB connectors and power buttons are flat across the top, flush. if you put something on the case, you could turn it off. 2) UPDATE: The one I bought for my current build has the glass side panel. Don't do this is quiet computing is your desire. Since the side panel is closest to all of the fans. w/o the sound deadening material, the case is noisier enough to notice. Not sure I'd detect this if I hadn't bought the full sound deadening version for someone else though. Much quieter than my other stuff, though. I like this soooooo much I am likely to replace my other two ... recent ... purchases .... with two of these, they are just soooooo quieeettttt....
Olabiyi Olugbenga Damilare
Great product, horrible listing
I loved this case design, simple clean and understated. Fits plenty of fans and even supports 140mm fans. Fits a full ATX power supply, but contrary to it's listing filters it does NOT support a full ATX Motherboard. Their website tries to make that clear, but with reviews, questions, etc on this listing that say that it does support a full ATX motherboard it can be very misleading. The product is great, but the listing is clumsy at best and most likely dishonest. They lump together several products that don't have the same capabilities or standards in an effort to boost review and question counts and make their products seem more popular. Don't bother reading any reviews, questions, etc. here for this product as you can easily miss that you are reading comments about a COMPLETELY different product that won't even support the same things you need. This product listing is a prime example of why Amazon filters don't work and people end up wasting time and money returning things that are improperly labeled. Just do yourself a favor skip everything on this page except the title and the price go to the manufacturer's website for any further details as this listing is full of information for a wide range of products and not necessarily the one you are looking at. TL;DR. Fantastic product, deceptive listing and dishonorable merchant conduct.
Vinod Singh Rana
Thermaltake H17 versa, best budget case fot its price
Best budget case for under $40 USD. Other cases in this price range are not the gaming type. What I mean is that this budget case has a PSU shroud, holes on the motherboard tray to route cables cleanly and the back has lots of clearance for cables. Also other budget cases in this price range are really flimsy, mostly the side panels. This case has an ok side panel, not too flimsy so that was a plus. The front panel comes off completely with enough room for 2 120mm or 2 140mm fans. It says 3 120mm but the wires that connect to the USBs, Audio and USB 3.0 get in the way of the third fan. If you want to put a a radiator on it you have to put fans on the outside and the rad inside the case. The only that thing bothered me was the shield cover for the back of the GPU screws would not hold or screw back tightly. They could have fixed this by just using 2 screws to hold it in place. The clips on it don't clip back into the case, and if I install it vibrates so I have to take it off. The best budget case for this price though. Lots of good features, the ssd mounts are awesome as well, they come with anti vibration screws.
Adam Escorial
Great PC Case for Gaming!
I bought this case as the starting point for my first-ever PC build. I have to say, I love it! It's got a very subtle yet serious look about it, and the tempered glass window allows a good look at the insides which I spend time looking at more often than I'd like to admit. It has tons of room behind the motherboard for cable management and looks very clean. It easily swallows up my: MSI Z390 Gaming Edge RTX 2080 Founder's Edition DeepCool GAMMAXX GT CPU Cooler (5) Noctua NF-A14 Case Fans The only thing that I didn't like about this case were the included fans. My build is intentionally RGB-free so the blue-ring fan had to go along with the other included fan which moves very little air. This is excusable in my mind because increasing the number or quality of the fans would have undoubtedly increased the price significantly. (In total I have spent nearly $200 on CPU and case fans!) After much experimentation I ended up with 4 fans blowing air out the top and back and one on the bottom sucking in air and blowing it directly on my RTX 2080. This setup has served me well so far and examining the dust built up on the intakes on the front of the case (where I have no fans) it is definitely moving a lot of air. One other thing that I noticed is that the fact that this does not come with a power supply cover is not a bad thing at all. It allows you to install whatever size power supply you want and allows for up to two fans to be installed along the bottom of the case. All in all, I am very happy with this case and would recommend it to just about anyone building a PC.
Claudia Kaya Leal
Quality Case - Budget Conscious Price
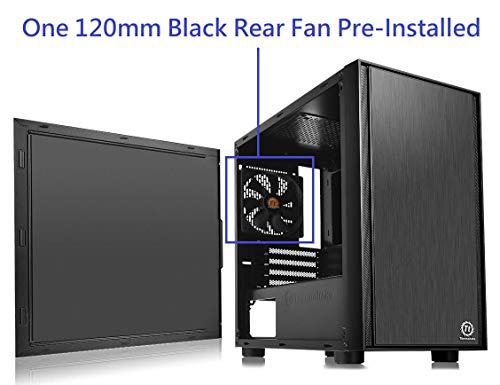
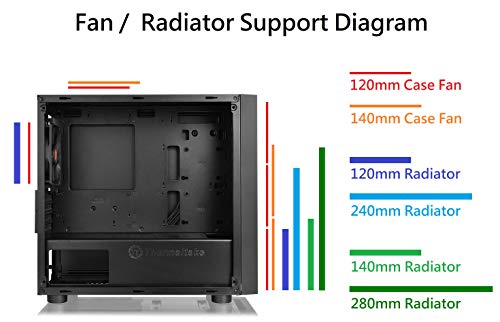
Needed to add some extra storage to my wife's PC and her OEM case wasn't setup to handle it. What's more, the OEM case had a single exhaust fan and no option for adding an intake fan or anything. (I'm looking at you ASUS). So I went looking for a replacement - wanted something that looked nice, would be easy to build in, and not too expensive. The Thermaltake Versa H17 definitely fit the bill. This is my first Thermaltake case. After my experience with the H17, I expect it won't be my last. (I'm giving serious consideration to moving my home server to a V21 cube chassis.) I'll go into detail about my experience with building in the case. First I'll mention, if you're re-using old parts or if you're on a tight budget and you've got / are getting a wired power supply instead of modular, the case is ideal. The H17 doesn't use traditional drive cages of any kind to mount drives - no doubt a cost saving measure - and instead uses a system rubber washers + screws where you can mount a 3.5" hard drive to the floor of the case under the PSU cover and second 3.5" hard drive under the top of the PSU cover. With this mounting system instead of drive cages, this leaves TONS of space to neatly tuck away your unused power supply cables. You mount 2.5" drives in the same basic fashion as the 3.5" drives, except the drives can mount on either side of the case's motherboard tray. I chose to mount drives to the back side of the tray to make cable management easier. The motherboard tray has a very large cutout to make access to the CPU backplate a breeze, should you ever need to. The side panels go on and off without any issues at all - unlike many other cases I've used over the years. Behind the motherboard tray there is PLENTY of room for cable management - especially when you include the space under the power supply cover. There are plenty of zip-tie points to help keep your wires tidy as well. If this case is missing anything it would be rubber grommets and velcro straps, however, including these would only end up increasing the price of the case. Let's talk for a minute about fans and cooling. With having a mostly solid front panel, there is going to be some restriction on the amount of air coming into the chassis. However, because the ventilation holes are on the front of the panel (instead of on the sides of the front panel like some other cases) the incoming air doesn't need to make a directional bend and lose pressure. The front of the case is listed as supporting up to 3 x 120mm or 2 x 140mm front fans along with 1 x 120mm or 140mm top fan (featuring a magnetic dust filter) and 1 x 120mm rear exhaust fan - a 3 pin basic black Thermaltake fan is included here. Only including the one fan is another cost saving measure on Thermaltake's part. When I purchased the case, I ordered 2 x 120mm Cougar Vortex PWM fans to use with it in addition to a 120mm Cryorig fan that I already own. While I don't think most people will need to add three fans to this case, I do highly recommend you get at least 1 decent fan to include as a front intake. My original plan was to include all 3 fans in the front of the case and leave the top fan location vacant. I changed my mind on this during the build for 2 reasons. 1 - The wires for the buttons, LEDs, and ports on the top of the case are attached to the front panel. When you install the fans too high up in the case, it becomes difficult to route these wires into the case. 2 - After I noted the position of the top fan location is in a more "forward" position relative to the CPU, I decided to put the 120mm Cryorig fan there as an intake fan. If the position were more toward the back, I'd have instead configured it as an exhaust fan. If I'd have made this fan an exhaust where it's located, I'd literally be stealing cool air that's coming into the chassis and exhausting it away from the CPU before it has a chance to make use of it. This is not withstanding that positive air pressure is best for managing dust. If this computer had a tower style CPU cooler (such as a Cryorig H7 or CoolerMaster 212 EVO) instead of a stock downdraft style cooler, I would not have added the top fan at all as this would just cause turbulence. If I were going to ding the score of this case for any reasons at all, it would be these points about the fan mountings. However, I don't feel it's appropriate to deduct from the score of this case at all. Here's why. As this case is a budget case, I don't expect many people who purchase it to plan on using 360mm AIO coolers - which could be difficult due to the wire issue that I mentioned - and in all honesty, I think the cooling configuration I've got in place right now is likely more optimal than my original plan for 3 fans in the front of the case. Running the 3 fans in the front would only have blown extra air under the power supply cover. Having the top fan more forward winds up being a plus because running an intake fan here alleviates any problems this case would have with pulling in sufficient air to keep things inside cool. All-in-all, if you're looking for an attractive case (especially if you don't want a windowed side panel) that is high on build quality but low on price, I would highly recommend you consider the Thermaltake Versa H17.
Juvelyn Licaros
Best industrial looking case. Period.
I really love this case. While most parts of a computer are all about performance VS price, the case is where craftsmanship and style come out. The funny thing is that Corsair, Asus, and MSI all come to mind for me when I think about computing products or gaming computing products, and when I went looking for a case, NZT and phantecks came up as well. I had never really heard of Thermaltake, and their name sounded weird as well. However, after searching though so many cases from all these different brands, I looked Thermaltake simplicity and Beauty. The Amazon page doesn't do the case justice, you have to go on the product page on Thermaltake website. It's very light, modular, and everything is easy to place. I have three hard drives placed on the back side with the included hard drive mounts. I can't say if this is a better deal than other lookalikes, but this hard Grey industrial design won me over. If you like this design like me, and are looking for a mid size case, I suggest stopping your search and buying this one. You won't be disappointed. Except for one thing..... This case comes with a plastic see through hole as you can see from the picture. It is kinda ugly when compared to what it could be, the tempered glass side panel. I didn't really know about tempered glass when I bought this case (I know right), and so, when I saw that they were offering a tempered glass side panel upgrade (check for it on Amazon), I bought it immediately, 2.5 years later from the original purchase. I now have added it to my rig, and I recommend buying the tempered glass version from now on. It is incredibly sleek.
Beth Conklin
This is the case you are looking for (***Not a Reviewer, Actually paid for my own case***)
So I have been building and working with PC's for as long as I can remember. I recently picked up the Suppressor F31 after a couple weeks of re-acquainting myself with the currently available case's as it has been a bit since I have purchased a case brand new. I decided on this case after my brother vehemently supported (And with good reason) the Fractal case line. Several things sold me on the case and kept me happy since I put it all together: 1 - The price - excellent cost to feature ratio. 2 - the sound dampening features - I tend to ignore the db of a fan and specifically focus on the performance and air it moves, so the added silencing of the case has been welcomed. 3. - The simplicity of the design - IMHO I don't want my computer to look like a sci-fi space ship or to look like some sex machine out of a Hentai cartoon, so the clean, simple and elegant design of the case drew my attention. 4. - HD mounting options - The ridiculous amount of Hard Disk mounting options that accompany this case is delightful. Especially once you account for the power supply cover ($20 from Thermaltake's Website, Mine is on it's way) which gives you 2 extra 2.5" (SSD) slots on top of the power supply enclosure in addition to the 8 already available possible Hard Drive locations and there is no way I was going to run out of mounting slots. 5. - 1.5" of cable management space behind the Motherboard tray - This is the most amount of space that I have seen in this size of case and means that if I want to go water cooled in the future I actually run tubing back there. As is, I have space for every cable and hardly any space is taken up. I even have my USB wireless AC adapter mounted inside the case back there running off of a 2 port USB-A hub connected directly to one of the USB headers on my mother board. I scrounged the hub off of the front panel of an old computer I had, so needless to say the hub is relatively large, but fits without a problem. 6. - Cooling Options!! - This case has by far the most adaptable cooling mount system of any that I've seen. Look up the specs (Not going to list them here), but whether it be air or water anything and everything will fit in this case. You could put up to 9 140mm fans (windowed version) in just the case itself. I'm going with 2 x 200mm Bitfenix Spectre Pro's on top, 1 x 200mm Thermaltake Pure in front, 1 x 140mm Thermaltake Riing RGB in the back and finally 2 x Coolermaster 120mm SickleFlow blues on the bottom. That's a good chunk of cooling for a simple home work computer. I was a little disappointed that stock it only came with 2 x 120mm TT-1225's which are being completely replaced anyways as they are a low end fan that provide only 41 cfm. I also feel like the case should have come with a fan hub right out of the box considering how many cooling options it has, but in reality adding a couple of fan cable splitters isn't going to break the bank, or even adding the NZXT digital fan controller as I have really isn't a horrible cost. Also I am glad that the case still has a couple of removable 5.25" bays. I know that the trend is currently toward 0 5.25" bays, such as NZXT's latest offering, and while I know that we will end up there eventually I still appreciate the idea of having them if I need them, and if I don't I can choose to remove them myself. I can't dock this case at all and I really dig it. I hope this at least helps someone that may be on the fence and stuck as to which case to choose. I went back and forth, over and over again for a couple of weeks between the NZXT S340, NZXT Phantom 240, Phanteks Enthoo Pro, Thermaltake Versa N21 and the Thermaltake Suppressor F31 before finally making up my mind and buying the Suppressor and I'm really glad that I did.
Dawud Basharat Yaqoob
Large, sturdy, well made mid-tower case.
Fan mounting is flexible both for location (120 & 140 fans can be slid about an inch up & down) and size (front & top accept 120 to 200's). First build I've ever done where I didn't have to add a single wire mounting block/bracket. No excuse for sloppy wiring in this baby. There is about 1.25" between motherboard shelf and right side of case. The removable external drive mounts are a nice feature that makes mounting drives a snap, after you remove the worthless tool-less mounts. Plenty of room to mount a 120 mm CPU cooler (H80i) in front of case (above drive cage), once you down size the existing 140 cage fan to a 120. The included fans are 140 mm - basic black in front, rear was a nicer blue LED Ring. The full glass window is a nice touch and good to show off your stuff. I had to file the drive caddy 2.5" mounting holes for my SSD, as the back of the drive cage interfered with the data connector. The 3.5" mounting was OK though. There are not a lot of options for a $100 mid-tower case that is over 8.5" wide, but this is a good one. I'd certainly do again.
Sarah McMurrough
Decent Budget Case
I picked up this case to replace my Corsair Carbide Air 240. This case is definitely a downgrade in terms of cooling; however, it is wide enough to fit the insanely wide EVGA 1070 FTW2 I purchased. First, building in the case was very easy. I was initially stumped on how to get off the front panel. It turns out you need to pull it off via a "handle" on the bottom. Other than that, It was a breeze to install all the different components. Tons of screws and extra standoffs are included. Second, the case only comes with one included 120mm fan (mounted on the rear, blowing out). I poached 3 additional fans from my old Corsair, and had no trouble mounting two on the front, and an exhaust on top. There's room for a third 120mm fan on the front, but it seems like it will only blow on the PSU; so, not sure what good that does me. Third, cable management is good, not great. The side panel where the wires get hidden can become cramped real quick. Also, I wish there were more notches along the edges of the case to tie down wires. Ultimately, these are small quibbles. Finally, my biggest complaint is the heat. Initially, I only had 3 fans installed due to the number of fan connectors on my mobo. GPU temps under load were in the high 70s. I got a fan splitter and installed the second exhaust fan, which brought the temps down to mid-70s. I wish I could get them a touch lower, but this is fine. Final verdict is this is this is a pretty good case for the price. EDIT: I did some tweaking to my GPU fan curves, and was able to get temps down to low/mid 60s under load! Revising review to 5 stars.