

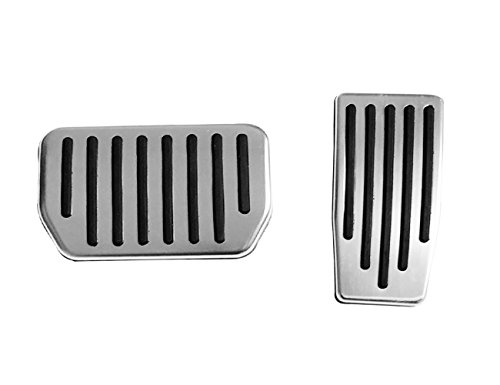
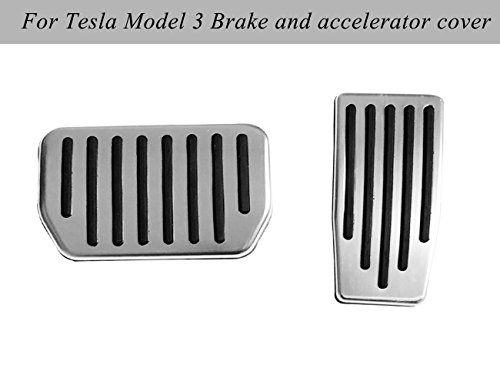
- 1.Enhance the style and appearance of your standard Model S or Model X with the Performance Pedal Set.
- 2.Non-slip surface design, safe for driving and strengthen the friction coefficient
- 3.Customized for Tesla Model 3 are generic,suitable size
- 4.Enlarge the area of the original Foot Pedal of your Tesla
- 5.Easy installation than Model S and Model X one, no drilling or welding required
-
Information
-
Twitter
-
Pinterest
-
Youtube
-
Facebook
Ana Ruiz
Fits perfectly on TM3
As others have said, let them air out before installing them in the car. Didn't smell bad after letting them sit out for two days, but it's hard to be patient when you want to get them installed ASAP. I tried to install them after one day and the smell was too strong for me to tolerate. It literally takes 5-10 minutes tops to install both pedals. I did it twice and it wasn't hard both times (removed them after the first day due to smell). You can't just shove them on expecting them to fit snuggly. You have to start on one side of the pedal (right side and work your way to the left) and get that side in tightly on the grooves and work your way around the pedal. I guess heating it with a blow dryer right before installing it might soften up the rubber and make it easier to install. You will also see small bits of rubber attached to the lines on the pedals but you can pull most of them off if bothers you or carefully use a razor blade to trim off the excess rubber. You don't really see them on the pedal once they are installed though. Makes a big difference in the looks of the car, especially after I upgraded my footwell lights. You can get it cheaper on ebay from the same manufacturer but I didn't want to wait weeks for it to ship from China.
Raptor Cat
They look sweet!
You really don't need instructions on how to install these pedals covers. Installation is very straightforward. For those who have a model 3, just remove the rubber cover on the brake pedal. It comes off quite easy. The acceleration pedal does not have a rubber cover, which I found to be quite interesting. Anyway, you can soak these pedals in hot water to make the rubber a little more supple, but if you have fingers of steel from training in the ancient martial arts for decades, you can just use brute strength to install them. Start with the brake pedal. I went front the top to the bottom and ran my fingers beneath the rubber along the sides. It's a very snug fit, so be prepared to feel a little pain. On the accelerator, I suggest sliding in the rubber on the right side first as you will have more room on the left side to get it in. This side is a bit harder as you're working with less real estate. But use the same method as you did with the brake. Done in less than 10 minutes. Good luck!
Waji Faizy
Not easy to Install-But it should be that way
I bought these to replace a set that I had purchased from a California custom Tesla accessories reseller who claimed theirs were the best, and that "the others" use cheap Chinese recycled rubber that is hard, and smells up your car. Well I will tell you right now that these are better than the ones I bought before. These were no harder to install, and because the brake pedal is the actual size of the under pedal it actually stays on, unlike the ones from CA that kept popping off while I was driving down the road. Buy these. You won't be disappointed. I know some people have complained that these are impossible to install, but that is absolutely untrue. I installed mine in a matter of 10 minutes with my bare hands.
Crystal Love
Perfect fit for Tesla Model 3
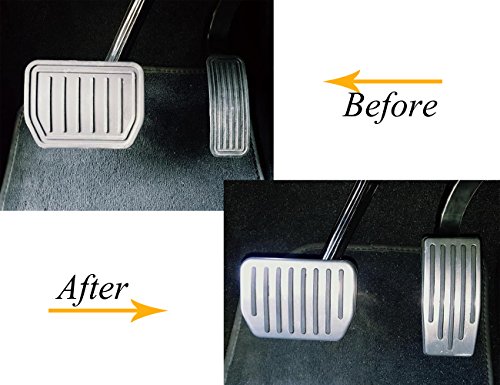
Fits perfectly in Tesla Model 3, made specifically for it. You can see from my pictures along side the original brake pedal cap that it's the exact same size. If had used a Model S or X pedal set, the brake pedal cap would have been a little too wide and not tight. Brake pedal cap was pretty easy to install, too like 10 seconds. Accelerator pedal cap was a little more difficult, taking me about 5 minutes. I did not try the trick mentioned by others of letting them soak in warm water to loosen up the rubber. I used a light and inspection mirror to check the back of the accelerator padto make sure it was on correctly all the way around. I just used my fingers on the brake pad as it was easy to feel if it was on correctly.
Saleem Nawaz
Awesome product..Quick Installation
This not only is a useful add-on to Model 3, but helps providing better control to braking/accelerating than the default rubber pads. Install was a breeze - took less than a minute. As shown in the directions, just make sure to soak the pads in hot water (microwave for 2.5 minutes) for about 10 minutes right before installation. That will help to loosen the rubber for a good and quick install.
Karen Gaeta
Perfect Fit for Model 3
After wasting my time ordering performance pedals from another company that claimed their Model 3 pedals were the right size (they weren't and claimed they were purposely made "adjustable" when they really were sized for Model S and X pedals), I decided to order these Top Fit ones. Pretty much exactly the same look except the brake pedal is sized correctly. Yes the rubber is hard and smells very strong, but once they are on they look fantastic and so much better than the stock pedals. I tried the trick of leaving the pedals out in the sun for the rubber to soften and it helped a bit but it was still difficult to put on. The rubber smell isn't a big deal; the smell goes away within a week or so. I did not have an issue with recessed rubber on either of my pedals, but maybe that's a QC issue that needs to be addressed. Overall, very pleased with these pedals.
Airic Aie
One of the best mods you can do to your non-P Model 3.
These are really high quality products. The rubber is high-grade, the aluminum surface looks fantastic, and install was done in about 6 or 7 minutes. Follow the instructions and soak in hot water before installing (I suggest drying with a towel after). This will make the rubber a little more malleable and easier to work with. Note that the accelerator pedal slips directly on top of the existing pedal, whereas you will need to remove/discard the brake pedal cover when you are ready to install that one. This really classes up the beautiful interior, and is one of those must-do projects along with the replacing of various interior lights.
Bart Bicknell
Perfect fit and look
I like how they look, way better than the ones that came with my Model 3 (AWD). For those having problems during the installation please follow the instructions on the product page (the product didn't included any instructions at all), I would say that having the new pedals warm during the installation helped a lot. In my case, the existing accelerator pedal was a plain plastic piece, I just had to slide the new one over it. For the brake pedal, I had to remove the existing one before installing the new one (look at the pictures for details). You will need a tool, like a short flat screwdriver to help you during the installation of the rubber flaps that keeps the pedal in place. I'm very happy with the end result.
Ben Fredj Sahar
Great Model 3 Upgrade
These look and feel very solid. I followed the installation video and soaked in a ziploc bag in hot water for 10 minutes before attempting to install. I took of the brake pedal off first and then made a separate trip for each petal so they could be in the warm water for as long as possible. It took a little patience and finger force, but it went on with no problems. My fingers are a little scuffed up, but nothing that won’t heal in a day or two. They fit very tight once applied. I did not notice a strong odor, but will update my review if any issues arise. Great $40 upgrade. I did not receive any payment or incentives to write this review.
Leathaj Cooper Degraw
Pedals really enhance the look of the interior
These pedals are as sturdy and handsome as they look in the photos, and they really enhance the look of the interior compared to the plain rubber pedals that come on all but the Performance edition of the Model 3. Just a small expense to make the car look much sportier. The installation is neither easy nor terribly difficult. Watch the installation video as you soak the pedals in hot water to make the rubber lip more flexible. A small, flat-head screwdriver helped me get the last bit of the brake pedal in place. The accelerator pedal was a lot easier, as it just slips over the existing pedal. I’ve already driven a couple hundred miles with these pedals installed and they’ve stayed in place and look and feel great.