


- ESP32 WIFI Kit for Arduino ESP8266 NodeMCU
- Driver Library - u8g2: https://github.com/olikraus/u8g2
- Instructable for Internet Time: https://www.instructables.com/id/WiFi-Kit-32-NTP-Clock/; Install guide and bunches of info: https://github.com/Heltec-Aaron-Lee/WiFi_Kit_series
- English documentation: https://robotzero.one/heltec-wifi-kit-32/; https://github.com/Heltec-Aaron-Lee/WiFi_Kit_series
- Operating voltage: 3.3V to 7V; Supports Sniffer, Station, softAP and Wi-Fi Direct modes
-
Information
-
Twitter
-
Pinterest
-
Youtube
-
Facebook
Phil Will
Good ESP32 board with OLED display!
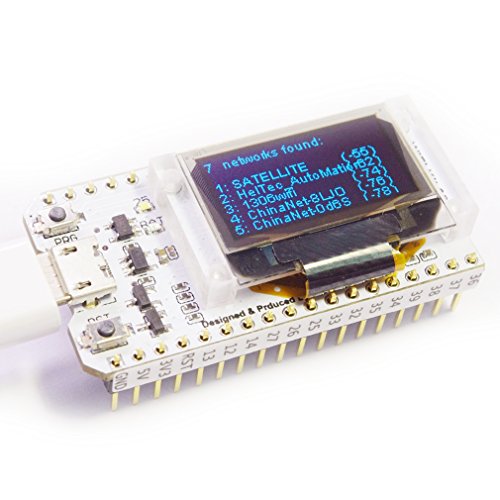
First impression: It was a nice little board with a small OLED display. Once thing I noticed immediately was the plastic base that the OLED sits on. The base was tighten by 4 small screws at the back. This makes the board more sturdy as the OLED position won't move around so easily. The pre-installed sketch was a program that does the wifi scanning, which is nice because you can tell right away that the wifi module and the display unit are both working properly. This can serve as a sanity check for the board. The easiest way to use this board is to use the Arduino IDE environment. For this board, one thing that I was particular interested was the touch pins of ESP32. It is one of the new features that ESP8266 (ESP32's little brother) does not have. I wrote a simple sketch to test one of the touch pins. It works well as expected. (According to the pinout, this board has 10 capacitive touch pins. If the OLED pins are excluded, the board has 8 touch pins) In addition to the above, this board also has temperature sensor and hall effect sensor (i.e. it senses magnetic field). Overall speaking, this is a neat little ESP32 micro controller board. The built in OLED is a plus if you want to display status of the board. For me, I sometimes like to use it to display debug message rather than depending on the serial port. Last but not least, if you are an advance user, you could use the Espressif SDK directly to have the full control of the board. I highly recommend this board!
Vanessa Nesken Dano
Great ESP32 board with screen standoff
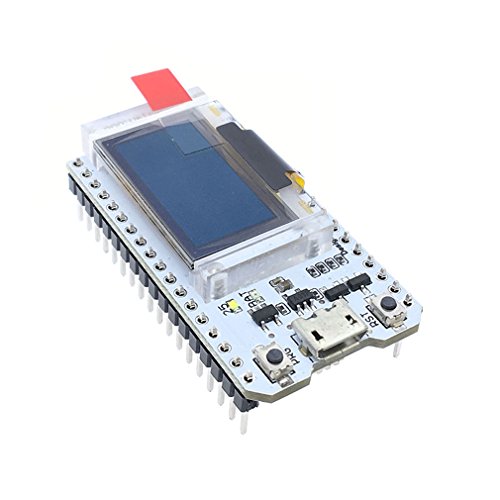
Unlike some of the other ESP32 boards with screens attached flush to the printed circuit board, this board has the screen mounted on a translucent standoff which is proud of the board by 0.2". This is very nice for packaging into a bigger project - the board can be mounted inside of a project case with the screen mounted flush to the outside of the case The boards with the screen mounted flush on the board have about the same height as the ESP32 package itself and are not as suitable to building into a case for a polished final product. Note that you will need to solder the header pins on yourself. In my opinion this is not a bad thing as it allows you to mount them backwards or use a 90 degree header pin depending on your needs. The example code on the board will scan for open wifi access points. It found mine and my neighbors with good signal strength. Additionally, there is a power connector on the back of the board. The connector type is Micro JST, and it's commonly used with small RC airplanes and helicopters. A quick Amazon search will give you a number of battery options. Given how flush the connector is to the board, you will likely need a pigtail to make the connection.
Barbie Dollie
Petite package of processor, display and connectivity.
Sherri Blalock
Nice esp32 board, really like having the OLED display
Jeanene Vanzandt
Kicks the ESP8266 to the curb
I LOVE the ESP8266, and own tons of them. But if you need the "horsepower", the ESP32 is the way to go. So much more functionality and speed. The tiny OLED makes this one complete. It's an all-in-one, do most anything sort of package. And for diagnosis, it could be quite useful. The built-in USB programming rocks. Very nice PCB quality. I like the pinout stickers- a nice touch. Got here faster than expected, so eBay takes a back seat to Amazon in this regard.
Stephanie Blair
Pretty cool
I'm using this to run micropython with the latest esp32 port "esp32-bluetooth.bin" Snag the "ssd1306 OLED" driver Use Thonny 3.0 or better, it now has integrated support for esp32, makes uploading and running scripts super easy on these boards now, no terminal needed to transfer files... which was confusing to say the least since i have no idea what i'm doing. Copy and paste this and don't forget to include the "ssd1306" driver on the board: import machine, ssd1306 i2c = machine.I2C(scl=machine.Pin(15), sda=machine.Pin(4)) pin = machine.Pin(16, machine.Pin.OUT) pin.value(0) #set GPIO16 low to reset OLED pin.value(1) #while OLED is running, must set GPIO16 in high oled = ssd1306.SSD1306_I2C(128, 64, i2c) oled.fill(0) oled.text('MicroPython on', 0, 0) oled.text('an ESP32 with an', 0, 10) oled.text('attached SSD1306', 0, 20) oled.text('OLED', 0, 30) oled.show()
Scott Mcfee
Great value, very easy to use
Khaing Nyein Thant
Big things come in small packages
In a previous review, I showed you an ESP32 hooked up to an external OLED. This item takes that to another level. This module has the OLED on the board. The default program is a WiFi scanner. Give it power, wait 5 seconds, and watch the networks this module finds. Excellent for clandestine wardriving. You can also use it as a signal strength scanner in your home or office. You can also flash it with another sketch and do the same things youd do with an ESP32 and an OLED (weather station, graphics generator, etc). About the item: This item shipped quickly. It is in excellent condition. Caveat: You are going to have to remove the OLED to solder the pins. Please use the smallest point you can find. Your 20th century soldering iron for 18 gauge wire won't cut it here. Mine did, but I got lucky.
Jean Basile Some
WiFi + ESP32 + OLED = Great fun
This is neat concept: An OLED display embedded directly on a ESP32 prototyping board. This even has a built-in antenna, so you don't need to buy or attach an external one. As soon as you plug the usb port into a power supply (or use the separate power connector) the device powers on and runs whatever you've programmed into it. The one I received starts with a WiFi scan program, so it displays the detected WiFi networks on the OLED display right out of the box. Programming it is a breeze too, with the free Arduino development environment. I just used tutorial from robotzero (listed in the product description) and got up and running in no time. This would also be a great gift for small electronics enthusiasts.
Christine Keirs
Great assembly quality, online docs, ESP32 is awesome
There are 2 primarily important things with any of these IoT boards: quality assembly and documentation. On the first issue, the board appears to be of relatively high quality. The soldering is consistent and good: perfect amount of solder on every connection. The board is clean, with no visible traces of leftover chemicals.The silkscreen is clear, crisp and text is readable. Packaging was quite nice, in having a little cardboard box enclosing the board contained in a two-part ESD bag (the other half containing the headers). There was also a sticker on the board with a support email address if there are any questions. The seller also sent an email shortly after delivery to ensure I was happy with my purchase. I really liked not having he headers pre-soldered. This allows top mount for using jumper wires directly, bottom-mount for use in a breadboard, or the flexibility to solder wires directly for a more permanent installation. The actual name printed on the board is Heltec Automation. A quick google search will provide a variety or resources on both the ESP32 site, as well as the HelTecAutomation GitHub account with the Heltec_ESP32 repository for sample code and how-to. Although similar boards may be available on auction or other Chinese sites, the great thing about Amazon is of course the awesome return policy and quick shipping. I've ordered my share of items from China and admittedly the month-long delay is no fun. My ESP32 arrived with sample code already loaded to how that the device was functional. The display showed scans showing WiFi functionality was working properly. The serial UART driver is the Silicon Labs CP210x, I probably would have preferred the CH340, as I've had problems in the past with Windows 10 replacing the drivers for the Silicon Labs. In my case, the board was recognized immediately - in part because perhaps I already had the Windows drivers installed. The important thing here is that is manually downloading and installing drivers - do *not* use the "universal" drivers for Windows 10. (my file is called CP210x_Windows_Drivers.zip) I've used a bunch of different ESP32 boards, and I am completely happy with this one. Full disclosure: the manufacturer offered a discount on the boards if I promised to write a fair and accurate review of the board. I am not in any way associated with the seller or company.