


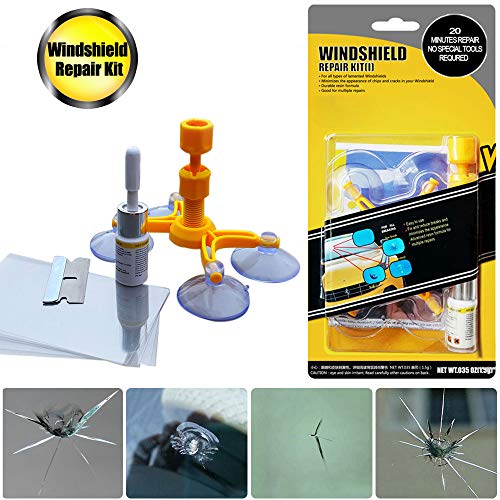
- PERFECT TOOL: Professional quality Do-It-Yourself windshield cracks/chips repairs with no mixing required, windshield repair kit can quickly and effectively repair small cracks chips only in 20-30 minutes. Save your time and money to prevents damage from spreading Restores windshield to near new condition. Long-lasting maintenance effect.
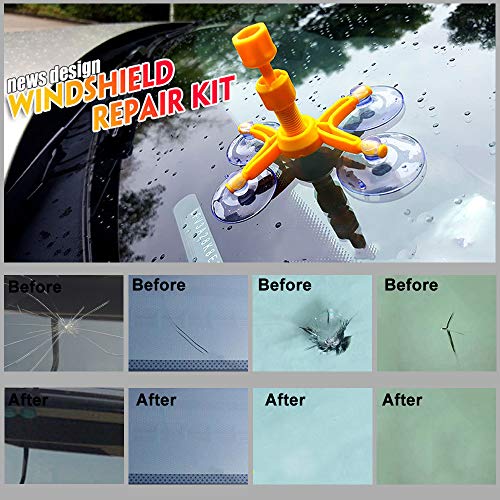
- WIDELY USE: Car Windshield Repair Kit is designed for most types of outer glass small damaged by double layer laminated windshield glass. The kit works best on small chips, bulls-eye, spider web, star-shaped, Half-moon crescents, crack not more than 12 inches/ 30 cm and round damage not more than one inch in diameter.(Tip: Not work for cellphone screen.))
- EASY to OPERATE: The method of repairing slight glass cracks is to clean and dry the glass surface before construction and then squeeze the resin into the cracks of the cracks or bullets, then put on the curing strip, then quickly dry and solidify under ultraviolet light 5-10 mins. It is to scrape off the residual resin with a spatula.
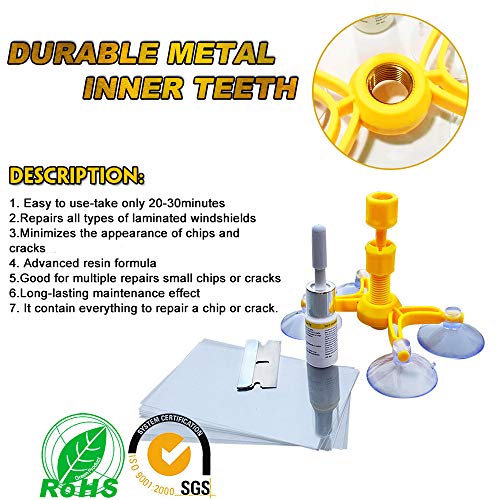
- ADVANCED FORMULA: Imported repair fluid (this is the key), the shear strength can reach to 20PA, the repair location will not be broken even though glass break. Enhanced injection plastic injection molding head, can produce a strong pressure to push the repair liquid into cracks.
- SAFE& WARRANTY: All material without chemicals or toxic material. 30-day money back guarantee. Repair job requires hands-on ability, if there are any quality-related issues with the item, please feel free to contact us, we can provide technical support when you need.
-
Information
-
Twitter
-
Pinterest
-
Youtube
-
Facebook
Dalia Avila
This kit really works and is easy to use
As you can see by the pictures, it works great. I suspect it would have worked better if it had been done shortly after being hit but it was like this when we bought the car. The only thing, the instructions are poorly translated but you can figure it out. Basically you position the frame on the glass and screw the applicator in to it. You make sure the end of it lines up with the center of your strike and screw it down against the glass. There is a rubber tip on it that seals against the glass. You then take the plunger out by unscrewing it and put several drops of the resin down the applicator and screw the plunger back in till it bottoms out. I got inside the car and it didn't seem to do much. The instructions said that if it doesn't fill in, you can carefully warm the glass with a blowdryer. That's what I did and it made the resin flow into the crack and it for the most part disappeared. You can still see a ghost of it but again, it probably has dirt in it. It did take the glare out completely. Once you get that part done, you pull off the frame and wipe off any extra resin on the glass. Then you take one of the plastic sheets they provide and put a drop in the cavity of the strike. Then lay the plastic over it and it creates a smooth, flat surface even with the glass. Then back the car out into the sun and it hardens after a few moments. Then you carefully peel the plastic sheet off and use the enclosed razor blade to scrape off the extra resin. It looks as good as any professional job I've ever had done. Very impressed. I suspect there is enough resin to do several strikes but I have no idea how long this stuff will last once opened. Sorry the pictures aren't better, it's really hard to photograph things like this.
Beth Conklin
Works great--I was VERY surprised and impressed!
The last thing any driver wants to hear is the loud "pop" of some little rock hitting your windshield at 60mph. But that's exactly what happened to me a couple weeks back. So, here I am, debating taking the car into one of those quickie-juffy-lubey type places who, for what I'm sure is a copious amount of money billed directly to your insurance, will "fix it", or alternately getting the windshield replaced at full cost. Because simply calling my insurance company to ask if they cover a rock chip would undoubtedly raise my premium for the next 5 years, I opted to avoid anything with insurance. So here I am, staring at roughly a 1cm "bullseye" on the lower left corner of the windshield. Not exactly mid-view but close enough to the line of sight to be really annoying. I'm a skeptic on cheapie made-in-China "do it yourself" type repair kits. Sometimes, they're awesome. Other times, they make whatever they're supposed to be fixing even worse and then you have to spend an order of magnitude more money or effort "fixing the fix." But I'm also cheap, and the prospect of throwing a relatively small amount of money at this problem became too attractive. So, armed with a total budget of $25 ($12 for this kit, plus another $13 for a pretty-dang-cool UV flashlight) I bit the bullet and bought this kit in the "Yellow" flavor, whatever that means. The repair took about 30 minutes, and that's because I spent the first 15 minutes carefully reading and re-reading the manual (that'd be the OCD...) --when playing with resins that cure it's best to "measure twice, cut once" to borrow an adage from construction. The manual is decent--definitely written in broken and misspelled English but readable enough to easily follow. Now that I know what I'm doing, I could repeat the next repair in about 15 minutes or less. The process is simple: I won't go into it here, but suffice to say that it works just fine; just follow the instructions to the detail. The result: only under REALLY close inspection can I tell there was a pit/bullseye there. I'd say my experience is the same as most others have written here: about "90%" fixed. The resin refracts slightly differently than the glass, so there's a slight "bend" type effect within the original repair area (which for me was an impact divot of about 2mm diameter, and a bullseye circle about 1cm in diameter around it), but it's not noticeable unless you're really looking for it. Just driving down the road, the repaired area is very difficult to distinguish from the rest of the windshield. Long and short of it: WOW!!! Fantastic kit for the $13 I paid, and I get to keep the really cool UV flashlight! Also, this repair kit includes enough resin to repair probably 20-30 hits, so it's not just "single use". Overall, completely happy. This is one of those ultra-cheap kits that actually does exactly what it's supposed to as long as you follow the instructions.
Craig Telfer
NICE!!
WORKS REALLY GREAT, FAST DELIVERY!
Joan Ellen Erbstoesser
To be blunt, it works!
But allow me to elaborate. First of all, opening the package, I was slightly overwhelmed by the number of steps involved in fixing the windshield paired with all these pieces. Phones, easy, but windshields? This seemed like a process. Nevertheless, the instructions were all on one page, which meant no flipping pages during the procedure to see what step comes next. Furthermore, it was illustrated: a HUGE help for me! Now let's be real, there are spelling errors. But I'm not writing the review on their spelling capabilities but on the product's ability to deliver what it promised to. It wasn't illegible, so I laughed and moved on. The first picture is the offender: the annoying ding that, from my drivers seat, reminded me incessantly of it's unwelcomed presence. We bought this car two months ago with this ding, so for the record, while the instructions recommend fixing these issues asap, no later than a week after it's occurance, I've been driving around with this for a while with no idea how long the previous owner had been allowing that crack to go. Something to keep in mind. So, putting the suction cups on and aligning the center where it belonged was easy... but when it came to screwing the first piece into the suctioned base, it would NOT go in straight. I tried. I tried again. I tried again. After realizing that too much of this error may defect the plastic threads, I resigned to taking the suction cup base off my car, aligning it perfectly, screwing it very carefully in just to get it started, then replaced it onto the windshield, looking inside the car to make sure it was realigned properly. Annoying, but easily overcome. The second photo is when I initially aligned it before I realized I needed to take it off to screw the piece on properly and then reattached it. I cut off the top of the resin bottle and, don't ask me why I expected it to be thicker, but I wound up accidentally getting resin on me. I had to cap it and run inside to wash my hands. I almost put on gloves beforehand but I didn't. Don't be me. Wear gloves, and cut the plastic tip of the resin bottle off carefully. Annoying, but not a big deal. My hands are not burning or irritated even though they're very sensitive so I'm sure no harm done. I put some resin in the chamber and followed procedure, removing the piece that forces the resin in (brainfarting as to what it's called) to allow air into the chamber and replacing it again twice. Blah blah blah, removed the suction cupped base and used a napkin to quickly catch the excess resin that remained before it dripped all the way down. I should mention it's a sunny day so in the images you see is the umbrella shielding the spot from direct sunlight. The third photo is after I pressed some resin into the crack. Already looking better! Cool! I then dabbed extra on the surface of the car as per instructions, covering it with the film and removing the umbrella to allow direct sunlight to cure the resin. Waited ten minutes... Came back and removed the film and WOW! The crack is invisible! Now, interestingly enough, as I scraped the excess off the surface, some of the surface of the ding became visible again. The instructions warned this could happen and, if so, to reapply some resin to the surface with the film. I didn't. I'm lazy. The last picture is the final result: a spot very hard to see, albeit still there. I'm almost positive a quick surface reapplication will make it disappear. I am no longer glared by a big black ding on my windshield. I sat in my drivers seat and can't even tell where the ding was. This product did EXACTLY what it said it would do. It delivered the results exactly as I was expecting. It was intimidating but easier than I expected. I would HIGHLY recommend this product for small windshield dings and I'm excited to see how well it works on my sister's phone as she ordered some, too, for her cracked screen. I'm impressed! So overall, 5 of 5 stars. It met or exceeded my expectations and I'm highly satisfied with the results! See for yourself!
Renn Belladonna
Gliston Windshield Repair Kit
I received it really fast, and it came right on time. this Gliston windshield repair kit saved me a lot of time and money. it is easy to use. I could fix my broken windshield just in an hour. thanks Gliston.
You Seong Lew
works as advertised
very easy to use, almost flawless. much cheaper than trying to do safe-lite or via insurance ... easy to use
Deepika Gurung
Good value
Works surprisingly well. I've bought other repair kits but they were only one time use unlike this one. The base is great. Sticks really well holds in place. Once I was done i couldn't even tell where the crack was. To be honest it was a very small crack. Only complaint is that instructions don't give times on how long to let sit. I let it sit for 30 mins before I removed the plunger.
Ping La
Easy to follow instructions
Had never used a product of this type. Easy assembly and use with detailed instructions. Worth the effort especially for an expensive windshield.
Doods Jet Cunanan
Very happy with this kit!
This kit was a very simple, thorough, and effective way to remove the huge chip in our windshield. We had to buy a new windshield for 500$, but then we found out about this. This product removed the chip completely till we didn't even see it anymore! It's holding up great and a great way to save money and get your windshield to look brand new! It even comes with extra supplies to repeat the process again later, and very detailed instructions to get it right every time. There's no amount of stars that can say how great this product worked out. Truly amazing!
Amanda Rauscher
Great Results...Easy, Fast, and Simple
I got the kit, followed the directions it was very straight forward. The results came out great on my large crack and small chips.