
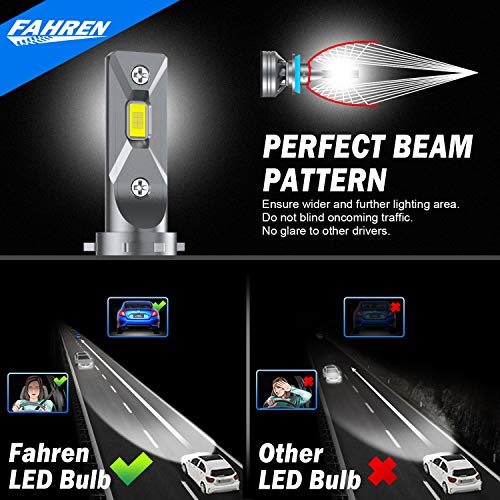
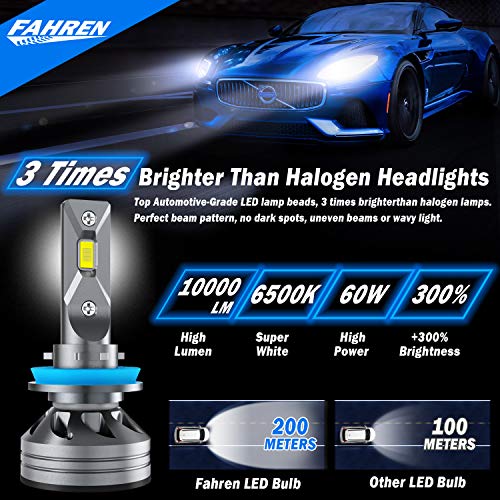
- 300% Brighter Than Halogen Top Automotive Grade LED chips with 60W, 10,000LM per pair, 6500K cool white. Super focused beam pattern design provides wider and farther lighting range which is 3 times brighter than your original halogen bulb.
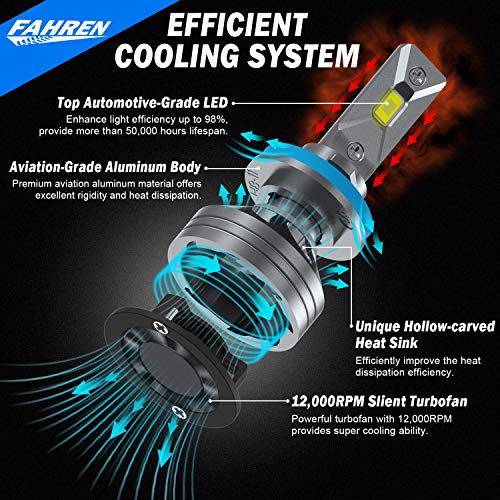
- Over 5,0000 Hours Lifespan Whole aviation aluminum body, unique hollow carved heat sink design and 1,2000RPM turbo cool fan provide super cooling ability, which ensures a longer lifespan up to 5,0000 hours.
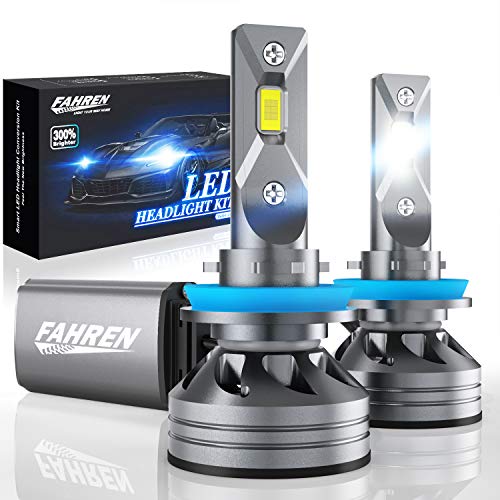
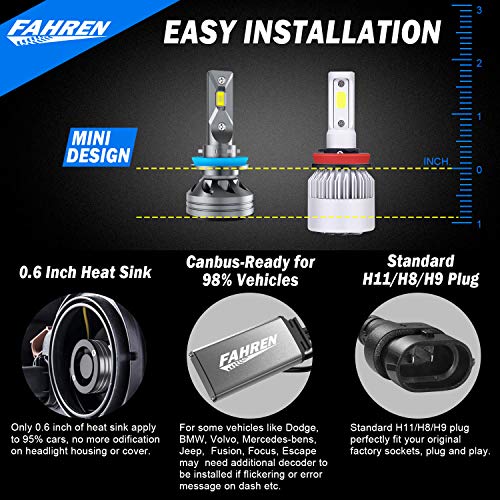
- 10 Minutes Easy Installation Almost 1:1 mini design same as halogen, perfectly fit into your housing and factory sockets without any modification, just plug and play.
- CAN bus Ready for 98% Vehicles Our bulbs work with 98% of vehicle's computer system without error, while some sensitive models of Ford, Jeep, Dodge, Ram, Volvo, Lexus, Chrysler, Mini and etc may require additional CAN bus decoder to be installed.
- Note The filter system may not be 100% accurate or up to date, please check your owner's manual or the part number on your original bulbs to confirm the bulb size. Refer to "how to pick the right bulb size" in our Product Description.
-
Information
-
Twitter
-
Pinterest
-
Youtube
-
Facebook
Yolanda Renee Small
Excellent bulbs (H11) but possible adjustments may be needed.
So installation was straight forward. Had to get a second set shipped as the first was defective. It was a quick turn around so that’s a plus on the company. Thanks for that. One major suggestion for anyone who may think the lights aren’t reflecting right is to use the little Allen key that comes with it to loosen the light and adjust it to the right angle. For people who don’t understand what that angle is, it should sit in the housing “vertically” and not horizontally or any other angle. Once I adjusted the bulb to the correct angle, these lights shined so much more brighter and looked so much better. This is especially important in Projector style headlights. You need to look at the set position of the bulb when in the housing, put a mark/line at the top of the bulb casing and then remove the bulb. Follow that line again to the actual bulb grooves because that will be your set position. If the mark and the actual light do not align vertically then you will not get the correct light output. Use the Allen key, loosen the tiny screw and twist the bulb to line up with the mark/line you drew on the grooves. Set the bulb back into your housing, and you should see a major difference in light output.
Bryan Hepp
Best LED lights within $100 category! Super bright super easy to install great support
This is probably the best LED set up at... this price range and even exceeding other product costing over $100.. I'm a professional truck driver and I mostly drive at night and these bulbs Excel under all conditions. They're extremely easy to install and are can bus ready so no dashboard error on your vehicle,See Photo 2017 Freightliner Cascadia Evolution Error Free Dash. Don't hesitate don't look for others this is it believe me when I tell you there are so many other products on Amazon that you could get lost looking where has this it's staring you right in the face if you don't trust me trust the other reviews...Fahren knocked it out of the park with this one! I will be buying a set from my high beams and my fog lights as I can't ignore quality and performance you get with these...No I have not been paid by manufacturer for this review, it's my honest review and satisfaction...Will update this review as time goes by if needed(Long Term)If I See Negatives..... also notice the bulbs clear my bulb cover perfectly...
Samantha Shizzam Rife
Awesome bright and very easy to install ...need to drive at night now 😎😎
I really really love them so far.... I just installed them so I will let you guys know in a month what I think then. I ordered the low beam and the fog lights for my Pearl White - 2016 Honda Civic EX-T .... H11 bulbs fit both....very EASY to install even the fog lights...now I have white lights on the whole front end... well besides the high beam lights which I’m going to order tomorrow- I think HB3 bulbs...I will show you in multiple pictures of before and after I installed them.... awesome awesome awesome 😎 see you guys about a month for an update......
Carey Jordan
Good LEDs
The pictures speak for themselves. I have a 2018 Big Horn my dad has a 2013 Laramie. Side-by-side. Stock halogen in the 13 Laramie and Fahren LEDs in the 18 Big Horn (9005 high beam, H11 low beam and 9006 fog lights). Easy to install. No additional capacitors needed for any lights. Not sure they are 300x brighter as they claim, but easily 2x or 3x brighter. Easily worth the $120 for all 3 sets.
Gina Ordiway
300% brighter
I got a brand new Chevy Tahoe and as you guys can see in the pictures the stock bulbs are trash. This Fahren headlights are fire!!!. Super easy to install, just plug and play. In the pictures I actually got them unadjusted so please make sure they stay horizontal, this is in my case with beams,....you will have to figure it out in other type of lights.
Jerry Wickizer
Plug and play
Bought this for my 2017 Honda crv. Been jealous with the newer cars with their led lights. Literally installed in 5 minutes, turn your old bulb anti-clockwise and put this in clockwise. I am surprised how much brighter the led vs my old halogen lamp. Light cut off point seems sharp, I have not received any complain from incoming traffic cars for blinding them.
Heather Ellis
easy install
I recently purchased 9005 for my '13 Scion tC RS8.0, using the brights and changing to low beams had a big change, low beams wasn't that great so I bought H11 from Fahren. install was a breeze.
Harry Howard
Great service
What a service! I had order theses light bulbs for my old Honda Pilot. Installation was easy enough and had them installed but one of the bulb didn't work properly (seemed loose wiring). My obvious action was to file a grievance with Amazon, and without any problem the vendor sent me the brand new one next day. As for bulbs, they are almost same size as the original bulbs. Installation is super easy. Light beam has nice even spread, similar focus to original bulbs. Light color is white, and pretty bright but not extremely bright to bother other oncoming drivers. As for longevity, I'll have to check back in a year. I would recommend.
Tara Gordon
Can work as DRL and with Fiat-Chrysler-Dodge with software...lots of info here
Had to return a set because the LED was damaged. The "aircraft aluminum" is really soft and the set screw stripped out when I was changing a bulb location. Once installed these bulbs are fine, but handle with extreme care while installing. TEST, TEST TEST your Chinese made electronics. I stress tested my bulb set by running my low and high beams for 1 hour straight and the bad bulb presented itself quickly. I'm testing these with the Beamtech H11. As for output there's no difference between light output or quality or cutoff line. The heatsink on the Beamtech gets scaldingly hot during normal operation. The Fahren spreads its heat between the driver and bulb fan very well. In close quarters operation, the fan of the Fahren is more useful. For the Fahrens, do yourself a favor and get some larger zip ties. Look for high heat points (300 deg F or up) and UV resustance. These cost very little per 100. Lastly for this update, I'm running LED highbeams at 13.4 volts, the most my vehicle allows. The reflector lens sends this light about 1/3 mile center over and forward of the low beam cutoff line in an urban setting. To be certain, Ultras by Sylvania or Phillips Super Brights would throw light much further, but the life of those bulbs is much shorter than the factory spec H11LL. I'm not unhappy though. With the software I described, I set my low, high and fog lights to be able to run simultaneously. *** The early review is that these bulbs are leagues above the stock headlights. I love the brightness and white light the Fahrens offer. I'm going to update with photos but I wanted to use this space to explain some information about LED upgrades in general, FCA products specifically and working with the Fahrens because the manual leaves a lot to be desired. TL:DR: The Fahren bulbs are fantastic replacement in the reflector lenses of the 2017 Dodge Grand Caravan in both the high and low beam positions. For FCA vehicles, you need software, like AppCar Diag FCA, to disable PWM voltage management (by switching the headlights to HID) to stop the LED flickering and to enable the volt step control if you wish to continue using the highbeam bulb position for the low beams. This can also be done by a decent dealership, but the software is easier and not too expensive. WARNING: Do not buy electronic items for any reason from the web unless you are ready to work with or install the product within the return period. TEST, TEST, TEST before throwing away the packaging! When installing the bulbs, read or watch videos online, even if you think you know what you're doing. Many, many newer cars use a headlight mounting system incorporated into the bumper or the trim. This means you may need to remove these things. Trim tools are cheap here on AZN. If your headlamp install involves removing plastic "xmas tree" fasteners, buy extra replacements here on AZN. Aftermarket fasteners can be bought in 25, 50 and 100 quantities for as much as 1 OEM clip. The black wire from your car's headlamp plug 'usually' is the negative (-), but this may not be universally true. If your get your bulb installed well and it does not light, first make sure the male plug from the car is pushed in firmly into the female bulb ends. The click sound alone may not indicate the bulb is plugged in fully. Second, if the bulb doesn't light and it's plugged in snugly, reverse the plug. The Fahren blub is polarity protected, it'll on light when plugged in properly. *TEST TEST TEST all lights in the headlamp assembly BEFORE your reassemble. The headlamp wire is part of a harness and you can dislodge other wires inadvertently. TEST TEST TEST all the bulbs immediately after reassembly for the same reason. FAHREN H11 BULB NOTES: 360 collar is not described in the booklet manual included with the bulb so I'll explain here. In the box you get an allen key. It's small and narrow so don't misplace the tool. There is a set screw on the collar, under the blue gasket. Loosen, but don't fully extract the set screw. Right is right, left turn of the screw is loose. Holding the bulb upright (power cable dangling down), you can push down on the collar against the white gasket and rotate the collar. Do not stop at the two index holes on the collar as a set position. Those index points are to remove the collar from the bulb and are not snug enough for inserting and removing the bulb. If your bulb does fit because of the locking tabs, you can try to get horizontal clearance at the index points, but for most installations this should not be an issue. Aluminum is soft. Do not overtighten the set screw. Snug the set screw without over tightening it. ***With the bulb in the housing, the LEDs need to be pointing left and right against the reflector, collector or projector, and be parallel to the ground. Said another way, the rectangle tip of the bulb should be perpendicular to the ground. This is essential! If your install goes well but your light looks dim or has dark spots, check that the bulb is mounted as I described here.*** ABOUT CANBUS: As your shopping for LED bulbs, you see info about CANBUS readiness and such, it's all BS. CANBUS is a vehicle communication standard pioneered by Bosch. Simply put, CANBUS is a language that you car's computer modules can use to deliver commands, record statuses for review and ensure that commands are valid as they are delivered in the heat and vibrations of your car's wiring. CANBUS also saves wiring as commands can be sent over wire. For example: on your CANBUS car, if you roll down the window in the back passenger side from the driver's seat, that front switch is no longer wired to the back window. All the window switches are computer modules--you press the window down button, the module under that button sends a digital code requesting a window rolled down, other modules on the CANBUS validate that request and once the recode is validated the window rolls down. This all happens at the speed of electricity. CANBUS is now a legal requirement on most passenger vehicles sold in the US and elsewhere as the full status of all CANBUS actions are stored in all of the car's computer modules, similar to an airline blacknox. Knowing that now, know this: There are no CANBUS ready bulbs. The BULB itself does not contain a computer module that sends codes in the CANBUS. Instead, what cause poor bulb compatibility is either how the car powers a bulb, or how the car detects a bulb that's blown out. For bulb power, a bulb can be volt controlled--lower the voltage, dim the bulb; or via Pulse Width Management (PWM) in which the car sends and removes current from a bulb at a speed inpercipitable to the human eye. PWM can extend the life of bulbs while saving electricity because for a few milliseconds, the halogen gas in the bulb continues to throw light in the absence of energy. This not only saves bulb life but also a modicum of fuel. Fiat Chrysler loves PWM. LED bulbs do not. RUNNING LEDs IN FCA VEHICLES: Most Fiat, Chrysler, Dodge and Ram that were designed pre-factory LEDs have software settings that can easily allow the car to run LED headlamps, but you'll need your dealer's help, or your own software. Many Chryslers run PWM by default, and this needs to change. I use AppCar Diag FCA. Funny name and a bit pricey, but this software allows you to change internal settings in FCA vehicles at the dealer level. This is software for a PC so you'll need that and and OBDII to USB interface cable. And old laptop is great for this. The relevant settings are as follows: -Use the "Canada" country code in the software. This will keep your dash measurements in the setting you had them in (US or Metruc) but give you full control over the daytime running light set up. In Canada, DRLs can be low beams, high beams at 50% power, fog lights or turn signal bulbs fully illuminated. If you car has DRLs set in the highbeams, the Canada setting may be active already. -In the software menu for Programable Features, select headlamps. In the setting for headlamps select HID/Xexon under the low beam menu. If you go on and select Bixexon, you will disable the ability to use highbeams as DRL, but this is not necessary: simply selecting the HID setting for lowbeams will disable PWM for both the low and hi beams. No ,ore flickering. If your want to keep the DRL in the highbeam and want to use LED, you can set the voltage for each high beam bulb individually between. 6 and 13.4 volts. Most bulbs on AZN are rated for 9 to 12, 24 or 36 volts (the Fahrens are 9-36 volts). Each whole volt belt 13 will dim the light output, so I'm testing my Fahren highbeam DRLs at 9 volts. When the highbeam switch is activated, the full 13 volts are sent and the reflector directs the light up and center of the lowbeam cutoff line. The lowbeam LEDs run at 13 volts. FOR VOLVOS: Good freaking luck: the low beam bulb out is measured by the resistance of the specified halogen bulb. The spec for this was designed too tightly by the engineers. You'll have to find a resistor that can exactly draw the resistance of the spec halogen bulb. If you can get your hands on VIDA software, there is a similar HID setting like the FCA process, but I dont have a way to test this. FOR OTHER CARS: "Decoder" is a fancy name for a resistor or capacitor or combination therein that attempts to trick the car into thinking that the LED bulb is using as much power as the factory specified bulb (the resistor), and stops flickering by storing voltage and releasing in a more normalized current (the capacitor). You success with this may vary. I am currently testing the Fahren H11 and Beamtech fanless H11 in my car and will report back often. I just got sick and tired of reading the loads of market speak or complete BS about this upgrade.
Tami Johnston-Cook
Plug and play. Way brighter than stock Halogen. (Vehicle: 2013 Subaru Impreza)
Finally feeling safe driving at night again. My halogens were starting to dim, so I knew they were on the way out. -Pics! The sun was setting during install, so the outside lighting is different in the Halogen pic vs LED pic, but it is still clearly obvious that the LEDs are WAY brighter. -Function exactly like stock, but way brighter than stock Halogen lights. ~200% -The light beam focus seems comparable to the stock halogen. -They turn on immediately, No flickering, no heat issues (it is cold this time of year though) If the fans make any noise at all, they cannot be heard over the engine/belts/radiator fan noise. -Installation of the actual led bulb to the housing was easy. The product fit perfectly in my 2013 Subaru Impreza Hatchback. *The plug IS DIRECTIONAL so if it doesn't turn on, unplug it and flip the connector over. *Some small plastics had to be removed to get to the lights for my particular vehicle. I have only had them installed for a week, so I can't speak about longevity yet, but a 2-hour mountain drive with no issues makes me feel pretty good about these so far.