
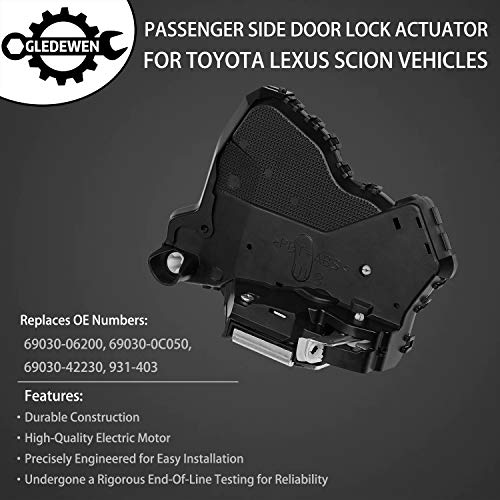
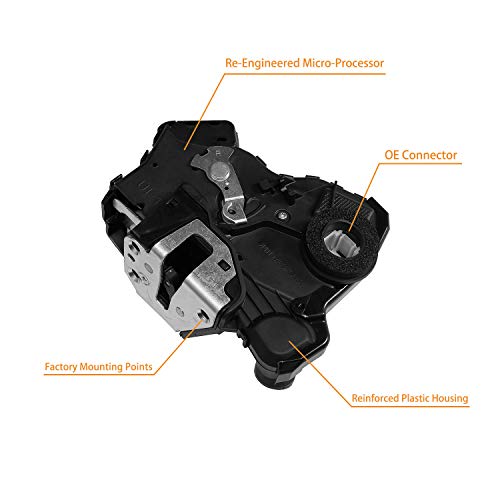
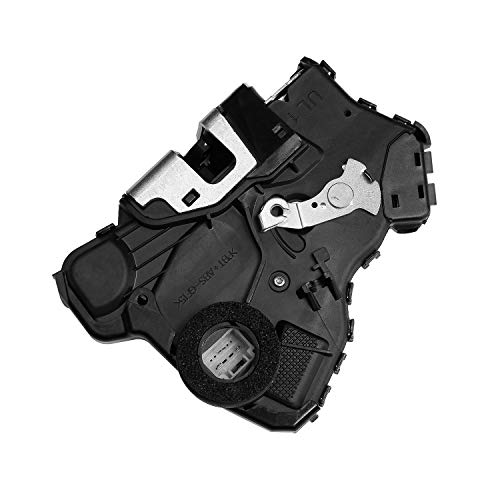
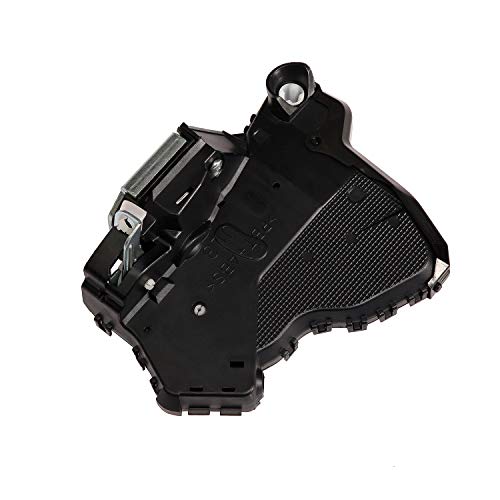
- 【OEM DESIGN】This power door actuator is manufactured to the OE specification to provide factory-fresh appearance and direct-fit, that enables proper door locking function. OE connector helps ensure a solid, positive connection
- 【PREMIUM QUALITY】Long life-span matters, that is why our passenger door latch is crafted from reinforced plastic to provide maximum durability and excellent performance. Engineered with an electro-mechanical exterior latch release mechanism to ensure more efficient and sleek operation
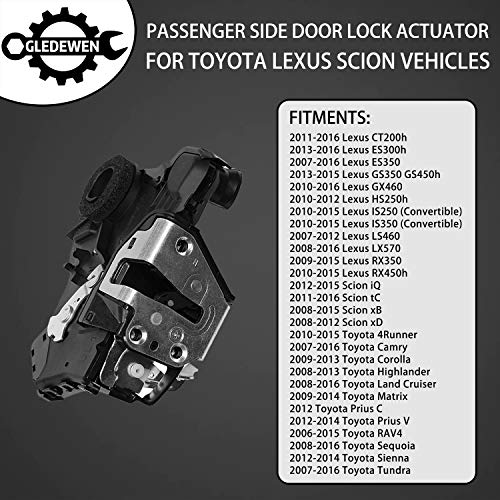
- 【FITMENTS】2010-2015 Toyota 4Runner, 2007-2016 Camry, 2009-2013 Corolla, 2008-2013 Highlander, 2006-2015 RAV4, 2012-2014 Sienna, 07-16 Tundra | 2010-2015 Lexus IS250 IS350 (Convertible), 2011-2016 CT200H, 10-16 GX460, 07-12 LS460 | 12-15 Scion iQ, 08-15 Scion xB | & More, SEE BELOW for all vehicles
- 【REPLACE OE NUMBER】69030-06200, 69030-0C050, 69030-42230, 931-403. The latch actuator has undergone a rigorous test to ensure excellent performance, which features a high-quality electric motor
- 【12-MONTH WARRANTY】If for any reason at all, you are not fully satisfied with the front door latch motor, you can rely on our service of free REPLACEMENT or REFUND
-
Information
-
Twitter
-
Pinterest
-
Youtube
-
Facebook
Yhumie Arevalo Chavez
Easy installation, but you might have to perform a reset.
I bought the drivers side version over the summer and installed it. It fixed the problem but the lock button on the outside door handle quit working. I saw someone else report the same issue. It was frustrating but I was living with it. A couple of months later the passenger side failed and I replaced it with this product. After installation, the passenger window would not stay up. I researched that problem and found the fix was found by lowering the window and holding the button down for 5-10 seconds and raiding the window and doing the same. I repeated the process for the driver side and that procedure solved both problems. After installing this product, I recommend you perform this reset/recalibrate procedure.
Mumtaz Sher
perfect aftermarket replacement. saved a lot of money for an easy fix.
ok, toyota prius c. both front door actuators went within 2 weeks of each other. the first side (driver) took me about an hour to do, it is slightly more complicated than this one. the key is taking it out properly. there is a rod that goes through it. you need to slide the old one down and then sort of tetris it out. if you move this without going straight down, you can jam the rod and it is much harder to remove. after the old one is out, put this new one in the same way. this one took me about 15 minutes, including panel removal and replacement because i had practice on the other door. the unit works perfectly and i saved about $300 over the dealer ship on this one door. in total i saved about $750.
Ashley Bree McNally
Fixed Power Locks on 2008 Toyota Highlander
The power lock on my 2008 Toyota Highlander stopped working with either the power button on the inside, or the key fob. This had gone out before, but the car was under warranty, so Toyota fixed it for $0, but estimated an $800 ($350 part + labor) price tag. It wasn't worth $800 for me to fix it, so I saw this and thought I'd give it a shot for $35. For the price difference, I was skeptical if this was the right part or would work. A few Youtube videos later and the door works great! Easy to get to on the Highlander with Youtube help and easy to get out. Two things to watch out for: (1) make sure to re-insert the outside door handle rod into a slot on the side of the actuator when reassembling. I didn't even know that was in there because you can't really see it when taking it out and there wasn't a video specific to the 2008 Highlander. (2) Make sure the wires stay clipped in position. One had popped out when re-assembling, so I used electrical tape to keep it in place. Thanks for saving me $800!
Les Davis
Be confident that you can DIY; it’s not too hard!
First of all do a search for undoing a Toyota door panel. You’ll see how it’s really not rocket science to switch out an actuator. But then you’ll see how there’s not a gull durn thing about the 2nd gen Highlander 2009-2012’s panel removal. I’ll try to wake you through but you own responsibility for damage. First get those plastic panel vehicle tools; they make things easier for tinkering. Remove the plastic cover where the side mirror rests. So it from the window side. Pop loose the plastic cover behind the inside door handle to expose the 10mm/Phillips screw & remove. Pop open the brown faux wood trim from the top which is held by plastic tabs. They reveal two Phillips screws, the other two of the three that anchor the door panel. The lower screw is deep inside a tunnel. Return to the juncture of the panel on the mirror side. Wedge your tool between the door and panel and begin popping loose the retaining tabs and then you can grab beneath the panel popping along the bottom, up the right side past the actuator, then along the top. I kinda lifted some while pulling out and the panel comes free. The actuator is anchored by 3 Torx screws. Tinkerers, get a set here because they’re used on most cars. Undo and place in a safe spot. There is plastic to carefully pull away from the door. Unplug the unit by the one set of power plugs that is secured by a tab you push in and then pull. Examine your new actuator. There are two cables that fit into that plus one metal rod that fits BEHIND the actuator. I didn’t know about that rod so reach around to feel it behind the old one you’re about to remove. Jiggle the actuator to slide that metal rod free and you’ll have to twist the unit clockwise to free it from the metal ridge inside the door. Lift it free and it still is attached by the two cables. Examine from YouTube videos of the older Highlanders and how the old actuator holds the two cables. Open the black plastic tab to expose the ball shaped end. Pop each cable free of the unit’s body. Rotate the ball end 1/4 turn to unlock. The second has thin metal shank that is Z shaped. Carefully free that as well. Attach the Z shaped end and then the ball end of those cables and anchor them to the body of the new unit. This is the part that I had forgotten when installing: reach in to find that heavy steel rod that attaches to the outer door handle. That end goes into the white plastic hole of the arm of the new actuator. Once you’ve slid it through, lift the actuator unit and swing it back around that ridge and set it into place and hand screw the 3 Torx screws. MAKE SURE to plug the unit with the power cable (I forgot that too lol). Test that the unit operates by remote and power buttons. Wait to manually lock and unlock the button for now. Also check to make sure that the latch is properly ready. It’s the black swing arm that latches your door. Mine was closed and when I tried shutting the door it didn’t latch. Pull the outside handle which I think opened the latch. Tighten all Torx screws. Check once more that there’s power before reattaching the door panel. Go in reverse to assemble and then test. Mine on a 2011 Limited Highlander works flawlessly now. All operations are retained, from manual locking to using the power buttons, the remote and also the automatic unlock when you walk up and put your hand inside the outer handle. You can’t beat the price and value. I’ve saved hundreds by doing the homework and having the patience to DIY!
Sheila Lyn Matela Bueno
Perfect replacement part for Toyota Tundra.
Toyota wanted over $300 for this part, not including labor. I am not a mechanic and was able to install this in less than 30 minutes after watching some instructional videos on YouTube. This part fixed the problem with the one door not locking/unlocking, which appears to be a relatively common issue. This worked perfect for the front passenger door on a 2013 Toyota Tundra CrewMax, but as I understand this will fit other makes and models. No additional parts or pieces were needed. It has been installed for over two weeks with no issues.
Katie Berry
2016 Tundra Crewmax
Product/actuator works great (granted its only been in the truck 8 hrs) and saved me time and money by not having to go to the dealer, even with extended warranty and $50 deductible, this was the cheaper route. Install was quite simple, hardest part is removing the door panel and rotating the unit past the window guide rod inside the door. Once you figure that out the outside door handle has a down rod that needs to be re-attached to the unit...i made the mistake of not connecting that and took me longer than expected having to re-pull the door panel off, etc. etc. Something that should take 25-30 mins. took me an hour. But its easily achievable with the proper torx bit and a philips screw driver...you dont have to be a mechanic ;-)
Anmol Khan
Identical to OEM
Due to the price, I was a little skeptical. However, I was pleasantly surprised at how it was identical to the original actuator that needed to be replaced. Everything lined up perfectly, and functioned perfectly for that matter. Will definitely purchase again. I installed this on a 2012 Toyota Camry SE
Rachid L. Manreal
Reasonably Priced and Easy to Install
Replaced the actuator mechanism in the front passenger door of my 2011 Tundra. This is the second time replacing the actuator in the same door. The first pair replacement was $1,200 at a local dealer service center. This item was less costly and easy to install. Fitment was perfect!
Jessie Mae Kent
Quick and easy
Installed this on my 2013 toyota, pretty easily. It only took about 30-45 minutes to completely change out the old one and put in the new one. Loving being able to open and lock my doors with my key fob instead of doing it manually.
Seth Wall
Great 👍
Amazing. Worked . Mechanic supplier asking for $240 plus labor. This one only $40 , save good money. Great 👍