


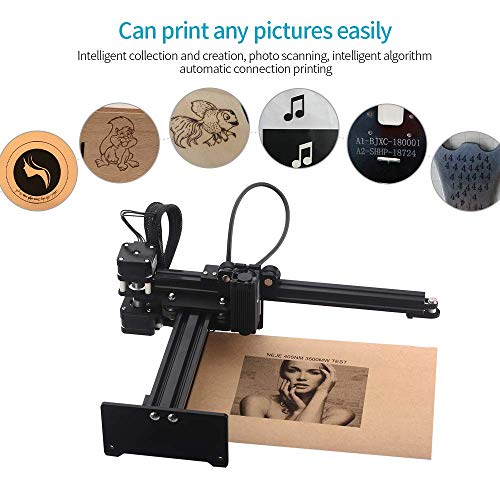
- ★ Provide professionals with the ability to directly parse the works designed by Inkscape and CAD software, directly execute .nc files and .dxf files, and execute them accurately. You can do the complex edits in PS / Inkscape / CAD or similar and just burn with the included program.
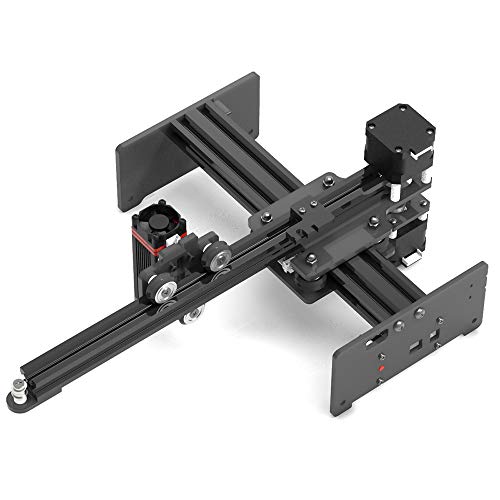
- ★ Standard 450nm 20W laser tube. The Master 20W excels in fast cutting and can cut materials from 3mm to 8mm thickness. 4Pin laser design with temperature sensing and surge protection design can effectively extend the laser life, and the laser interface supports other machines developed by KKmoon.
- ★ Compatible with a variety of power lasers, while supporting 4pin 405nm 3500mw, 4pin 450nm 7000mw and 4pin 450nm 20W. Multi-functional keys can support offline work: press 1 time to reset automatically, press 2 times to perform frame positioning, press 3 times to start engraving, press 4 times to stop engraving.
- ★ 4A load current, capable of delivering powerful output power, 15,000 rpm fan and exquisite heatsink design, can keep temperature safe control within 60 degrees Celsius, maximizing protection laser life, no matter how high-intensity you use, no matter how you work how long. Full-featured that directly execute .BMP, .JPG, .PNG files and NEJE CLOUD provides thousands of engraving materials and resources to download and keep updating.
- ★ Especially good at cutting, It can cut wood (3-8mm). It supports metal engraving including alumina oxide and other non-reflective materials, depth of engraving (0.5-3mm wood).Supported engraving materials: Wood, gray paper, leather, bamboo, blackening plastics, rubber, alumina oxide,etc.
-
Information
-
Twitter
-
Pinterest
-
Youtube
-
Facebook
Apple Gabriel Cabading
AWESOME LITTLE MACHINE !
The instructions could be a little better, but once you understand how it works, its a great little laser ! you can get very accurate laser images from basically a picture !
Jonathan Birdman Martin
Purchase recommendation
I have used the device for several days,so far I am very satisfied.You have to experiment with the setting because of the different materials. With a surface of 15cm x 15cm a lot is possible.
Lorraine Moser Baron
Great laser engraver - requires fair technical skill
I was expecting to have to do a lot more assembling of parts when I ordered it, but it was actually nearly complete right out of the box! All you have to do is mount 1 assembly, put on 4 screws, and attach 2 cables and then 2 more screws and a cable for the laser itself and it was all set.{doesn't matter which laser you have} But there was one problem with the hardware in that the USB cable they provided was bad. It was the original {now old fashioned} large connector size USB cable type. Most USB cables you see today are micro or mini, but this one was the most basic USB cable, the first kind ever made. But KKmoon gave me a very thin, obviously untested, and very short version of this cable that did not work. Of course I had several in my office, and one of my old 6 foot cables worked just fine {the bad one was so small I would have replaced it anyway}. So if you follow all the software instructions and it cannot find the laser, try a different USB cable. I used an old computer, one I intended to dedicate to the machine that even had Windows 7 on it, so it needed a .net upgrade to a version above 4. Then you need to install the driver, and they don't make that too obvious in the instructions but you have to have it install the USB channel 341 {or something close to that} port software. Then you need to plug in the USB cable and plug in the laser's power cable so it lights up. Then you need to actually run the software they had you download and it has a handy little test interface window that shows you the process of discovering the laser over USB on that channel. Once that test completes and the test window disappears, the laser will actually come to life and the motors will move the laser to its zero axis point. Note that the laser will be on even if you just plug in the power with no computer, but it's just like a little laser pointer and it won't hurt you unless you look directly into the lens. DO NOT LOOK INTO LASER EVER!!!! You can pick your pattern out of their library, or put one in their collection folder and use that, then you get a chance to add text and move the pattern around in the plane the laser can hit. Once you OK that you get to the point where you can actually cut or engrave something by hitting the play button. But use the box button first, that shows you a rectangle with the laser of exactly where it is going to carve so you can situate the material you are engraving under the laser properly. Note also that when the laser starts carving or engraving, those little motors will whip that laser back and forth very quickly, and the force of that movement can move the whole laser frame, so you really need to screw it down somehow. One last important note: on that last window with the big play button there are 2 other sliders that are very important! One is the laser power percentage, and since I have the 20W laser, I put it at 20% which burns nice and deep on wood I have used. The other very important slider on that window is the dwell time on the very bottom which controls how long the laser will sit on each dot and burn it in. My 20W laser only needs 3-4 milliseconds to make good carvings, but if you have a smaller laser you might need to turn that up to get deeper cuts. But these two settings are important because they control the effective power of the laser. Other folks said the 20W was only for cutting, but it is not true, you can easily dial back the power with those settings. One last note: WEAR THE GLASSES THEY GIVE YOU BEFORE YOU PUSH THE BIG PLAY BUTTON THAT STARTS THE MACHINE CARVING! You don't need them when you are setting up, but you will when it is actually carving stuff! Good luck and God bless.
Bunnary Hang
Quick Setup. Overall good
Jessie Besson
Clean Cut
This is an initial laser engraver for me, just wanted to see if I wanted to dabble in this. I love it! The software is pretty easy to figure out. It is easy to set up, easy to use and does a great job.
Simone Gallimore
I love it
Works great .try on different material
Marsha Robinson
Does what it says.
The little handbook that is included leaves something to be desired and the online instructions could be better but having said that the assembly is pretty straightforward and obvious. Installation on Windows is very simple, there is a driver and the design software online, but again these could be made easier to find. There is a more recent version of the software which seems better so well worth taking a look at. Most CNC software is aimed at parallel port controllers and there seems to be no "Simple" Linux equivalent to the software provided for Windows and MAC, but the makers recommend using Inkscape which is open source for Windows, MAC and Linux so that would be a good option to learn. It can generate files that the provided software can use. Best to download the version recommended because the "Dialect" of G Code the machine controller uses is quite specific to the machine. Because the machine actually sits on the workpiece it should be possible to do large designs in 150 mm squares and then carefully move the machine to align the sections. 150mm is almost 6 inches (5.9"). There is a learning curve as far as settings for different materials are concerned and you won't be carving metal designs any time soon, but for the price it compares well with other small machines. I would add that if you are thinking you might want to upgrade to the 20 watt laser head later it would be much cheaper to just find the 20 watt model right away which would get you the 3 amp power supply and head for quite a bit less than you would pay separately. I have to add that the first 20 Watt upgrade I bought failed after very little use - only 10 days and maybe 20 small test jobs. (That was not bought from KKMoon). Had no problem getting it replaced very quickly by Amazon and the vendor, both were very helpful, however on Christmas Eve the replacement failed in exactly the same way. It is not a problem with the controller on the machine or the 3 amp power supply, both work just fine with the original 7 Watt head, so although I suggested buying the 20 Watt version of the machine I am now having second thoughts about that recommendation. I've certainly given up with the 20 Watt idea. There has been a software upgrade and once I got used to it have had no real problems but it does not understand some G Codes generated by other software so unless you want to change the controller or edit a lot of G code manually you basically have what is supplied and the inkscape version from their website.